
How to create a website with WordPress in 2024
Free step-by-step “WordPress website creation” guide with video and text explanations for beginners.
Are you looking for information to create your website? Building a website can be scary, especially if you are not very technically inclined.
Don’t worry; you are not alone. I have helped hundreds of people create a WordPress website with my articles. Therefore, I decided to make the most comprehensive step-by-step guide to building a website. You don’t need to be able to code for this.
Who is this manual for?
Are you curious about what you can learn in this tutorial? Here is a brief overview from start to finish with all the steps I will help you with.
- Step 1: Domain name and hosting
- Step 2: Install WordPress
- Step 3: Secure connection (SSL / HTTPS)
- Step 4: Setting up WordPress
- Step 5: Install Astra theme and plugins (Beaver builder and more)
- Step 6: Create and set up the WordPress website
- Step 7: Create a blog page on your WordPress website
You are given a choice in this article. You can follow the explanation in a video or follow the description in text with accompanying images. Choose whatever works best for you personally.
VIDEO
Essential links to components we use in the video while creating a WordPress website.
- Webhosting: Siteground with 60% discount on your 1st contract period
- WordPress theme: Astra
- WordPress plugin: Beaver Builder
- WordPress plugin: Ultimate Addons for Beaver Builder
- WordPress Plugin: WPforms Lite
Want more explanation than the one you get in the video? You can also view the WordPress website making tutorial with text explanation. Continue below for the text explanation.
What exactly is WordPress?
WordPress is a Content Management System; we will call this a CMS from now on. With a CMS, you can easily ‘manage’ your website. You can log in to your website and add texts and images in a graphical environment. Adapting your website can be compared with creating a Word document. There is no code needed to manage the website.
The first version of WordPress appeared in 2003 where it was initially set up as a blog. The platform is an open-source system built and improved by thousands of developers worldwide. More than 60 million websites use WordPress, giving it a 33% global market share.
Why use WordPress?
There are dozens, perhaps hundreds, of alternatives to WordPress. Other well-known open-source systems (CMSs) are, for example, Joomla, Drupal. However, site builders such as Wix and Weebly are alternatives that are often chosen to create their websites. In many cases (not all), WordPress is a very convenient choice. We list the main advantages:
- WordPress is free (the software is “open-source”): As already mentioned, WordPress is open-source. This not only means that the software is free to download and use, but it also ensures that anyone can contribute to improvements to the system.
- WordPress is the most widely used CMS globally: 33% of the Internet runs on WordPress. This is all the more impressive when you consider that the numbers two (Joomla) and three (Drupal) have only 2% and 3% market share. Of all websites that use a CMS, 60% choose WordPress. A significant advantage of an overall system is that many programmers are familiar with the software, so you can always find developers to modify your website.
- WordPress is easy to start (and easy to expand for experienced users): The main advantage of WordPress is its ease of use. This is especially true for beginning website owners; for them, this CMS is straightforward to learn. At the same time, there are also many possible extensions. Some very many developers have created Themes and Plugins to make the websites better and give more options.
When is WordPress NOT appropriate?
We already mentioned that having your website is often a wise choice. However, there are, of course, exceptions. For example, we don’t think this is the best choice when creating a web store. However, it is possible to create a webshop.
✘ Could you not use it for a web store?
For creating an online store, you have the WordPress plugin Woocommerce. This turns your standard WordPress website into an online store. Still, this is not ideal, and there are more targeted solutions for web stores. For example, look at the open-source platform Magento or a system like Prestashop.
✘ Please don’t use it for a Community
This is also not the most suitable choice for an online community. There is a possibility for this; you can use the plugin Buddypress. However, a CMS like Drupal is more ideal for creating a community website.
What are a domain name and web hosting?
A domain name is a web address on the Internet. This is what users must enter to reach your website. For this website, the domain name is hostingfanatic.com. If you want to go to Google, you go to the domain name google.cm.
In addition to a domain name, we also need website hosting. All but all websites on the Internet need hosting. This is the foundation of a website. Everything that will be placed on a website is set on hosting. Think of all the files, images, text, and everything else on a website. You would not be able to read this text if I did not have hosting.
The cost of a domain name and hosting varies significantly from one hosting provider to another. A domain name costs around €8 – €15 per year, and some companies give extreme discounts the first year to get you in the door. Hosting is a bit more expensive and costs around €10 per month on average when you start.
Fortunately, I have an excellent offer for you. SiteGround is offering a 60% discount on the 1st contract term. This allows you to get hosting from €5.99 per month.
The purchase domain name and web hosting
If you want your domain name with web hosting, you can click on the button below. It will take you to the hosting provider SiteGround. HostingFanatic I also host on here, and at Siteground, you have an excellent offer.
Click here for Siteground hosting packages and a 60% discount
As I said, I hosted HostingFanatic myself at SiteGround. The reason is simple. SiteGround is one of the largest and best-rated hosting providers internationally. 24/7 support via a live chat, fast hosting with a built-in WP cache, free HTTPS (secure connection), and much more. SiteGround is also officially recommended by WordPress.org itself.
The only disadvantage might be that it is entirely English-speaking, but this is not a problem for most people. In my opinion, SiteGround is currently the best hosting choice you can make in terms of value for money, which is why I host HostingFanatic here as well.
Almost all web hosts offer the possibility to start a WordPress website then. The differences between companies are more in other things like; accessibility, rates, web hosting speed, optimization for WordPress, additional features, etc. Check out 3 advanced packages below.
Advanced Hosting Packages Optimized for WordPress
Package 1: TailUp from SiteGround (normally €12.99 per month)
✔ 1 website / 10 GB disk space
✔ Suitable for approximately 10 thousand visitors per month
✔ Automatic updates of Plugins
✔ Automatic updates of Core
✔ Cache & CDN
Website relocation
Now €5,99 per month (first year)
Visit SiteGroundRecognized
hosting by WordPress.org (adv.)
Package 2: Shared One by Savvii (€35 per month)
1 website
Varnish caching
Automatic updates of Plugins
✔ Automatic updates of Core
WordPress Staging
No SSH
Package 3: Website from Xel (€24.75 per month)
✔ Xel Boost for dozens of visitors at once
Varnish and PHP caching
WordPress Staging
✔ Relocation
✔ Fix at Hack
Choose a hosting package at SiteGround
Create a WordPress website step by step
This is a step-by-step guide on how to create a website with WordPress. I have divided everything into several steps. I will take you from the beginning to the end.
All you have to do is follow the instructions, and you will have a professional good looking website as a result.
In addition, I will give you tips on how to take your website to the next level.
Have fun creating your WordPress website!
Are you ready? Let’s start creating a website right now! Below is the table of contents, so you can go directly to a section you want to look at.
You can also use the table of contents to pick up where you left off later while creating your website.
Step 1: Domain name and hosting – the foundation
One of the most common mistakes beginners make is choosing the wrong website platform. Fortunately, you are here and will not make this mistake.
When it comes to creating an excellent professional website, self-hosted WordPress.org is the best choice. You can choose from thousands of designs and additional features here, making website creation possible in all kinds of variations.
The software WordPress is free and available for anyone to download. Still, you can’t create a website completely free of charge. You do need a domain name and hosting.
Once you have clicked on the SiteGround button, you will be taken to the following page:
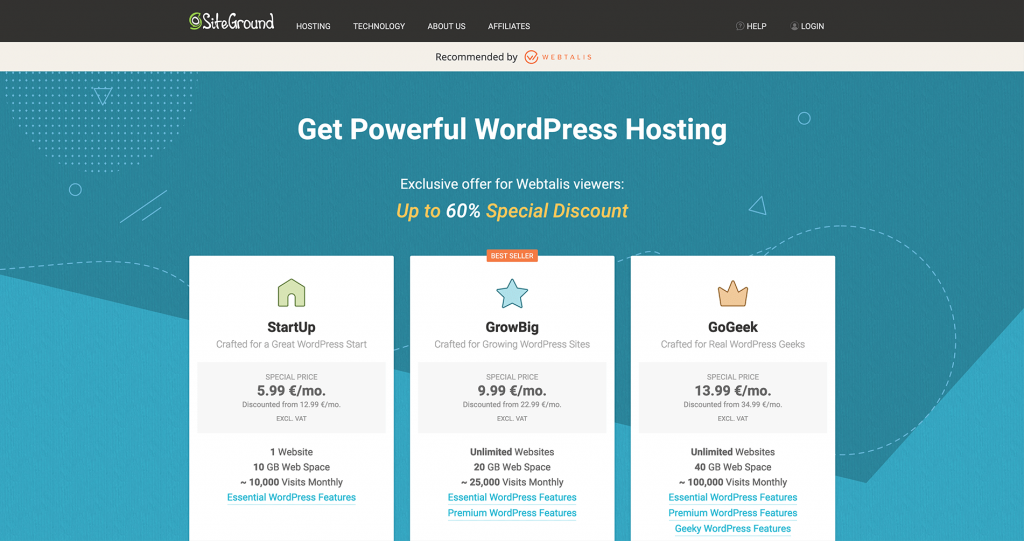
SiteGround has three different hosting packages. The packages are called StartUp, GrowBig, and GoGeek.
The StartUp package costs €5.99 per month, and you can place one website on it, you have 10GB of web space (this is more than enough), and you can get 10,000 visitors per month.
Want to create one website? Then this package is perfect to start with.
The GrowBig package costs €9.99 per month, and you can put as many websites on this package as you want. This is handy if you plan to create multiple websites or build websites for customers and take care of the hosting. Furthermore, you have 20GB of web space here, and you can receive 25,000 visitors per month. You also get built-in WP caching and the ability to create test environments at the push of a button.
This package is perfect if you are starting and have plans to create multiple websites or grow further and want to get serious—great value for money.
Finally, there is also the GoGeek package. This package costs €13.99 per month. You get 30GB of web space and can receive 100,000 monthly visitors. Furthermore, you can use Git (for the techies) and add users to have a website managed.
When you start, this package is a bit excessive, but when you want to create a large webshop or have many websites, this package with more space and server power is ideal.
What you get with all packages
Apart from the differences per package, you also get some basic features with every package from SiteGround. For example, you get:
- Free simple WordPress installation;
- Automatic updates for WordPress;
- Free SSL (secure HTTPS connection);
- Free CDN (Content Delivery Network);
- Daily backups, super handy for when something goes wrong;
- Free professional email addresses with your domain name;
- WP-CLI and SSH (for the techies);
- Unlimited number of databases;
You don’t have to understand everything above right away, but they are several valuable features that you would love to get from any hosting company.
Make your hosting package choice.
I hope the above information has helped you make a choice. Choose the package that suits you best. Click on “Get plan” by the package you want. Don’t be afraid of taking a package that is too small for you. You can always upgrade to a higher package.
Register your domain name with SiteGround
Once you have chosen a package, you will be taken to a page where you can have your domain name registered—the web address where you can be found.
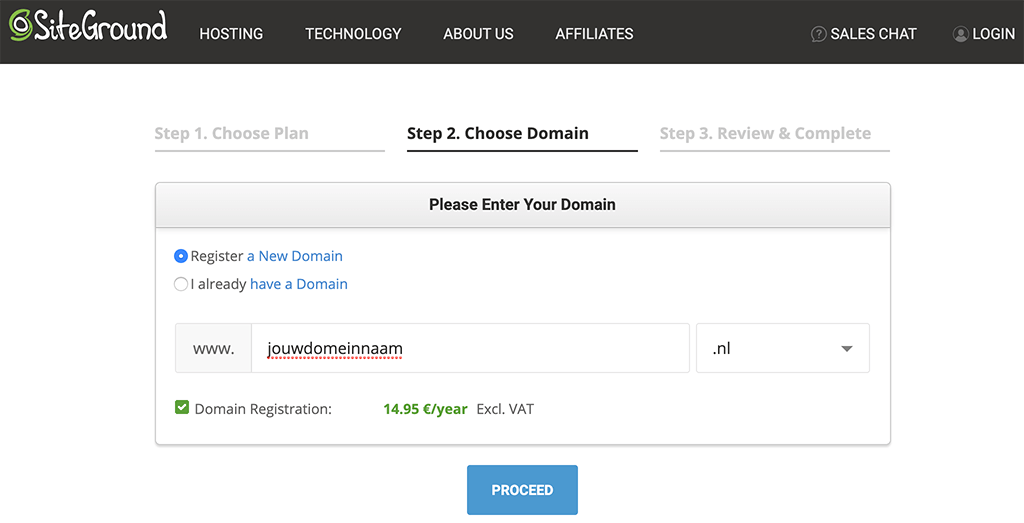
If you already have a domain name, then you can click on “I already have a domain.” If you do not have a domain name yet, you can fill in your desired domain name.
In the column next to “www.” you can enter the name of the domain name you want. In the column “.com,” you can choose the extension of your domain name.
For a US website, I would always go for .com. If you have an international website, choose the .com extension.
Coming up with a domain name can be tricky, but it shouldn’t become an obsession. After all, there is no such thing as a perfect domain name. The success of your website depends on what you make of it.
Enter the domain name you want and click “Proceed.”
Don’t know if the domain name you want is free? When a domain name is occupied, you will see the message below:

You will have to develop another domain name because only one person can use a particular character and extension on the Internet.
Did you choose a domain name that is still free? Great, you will now be taken to the next page.
Complete your order and get the best discount
You have now arrived at the last page to complete your order and take the best possible discount on your order. I’ll tell you how to do this in a moment. Now first, a quick look at the page you’ll see:
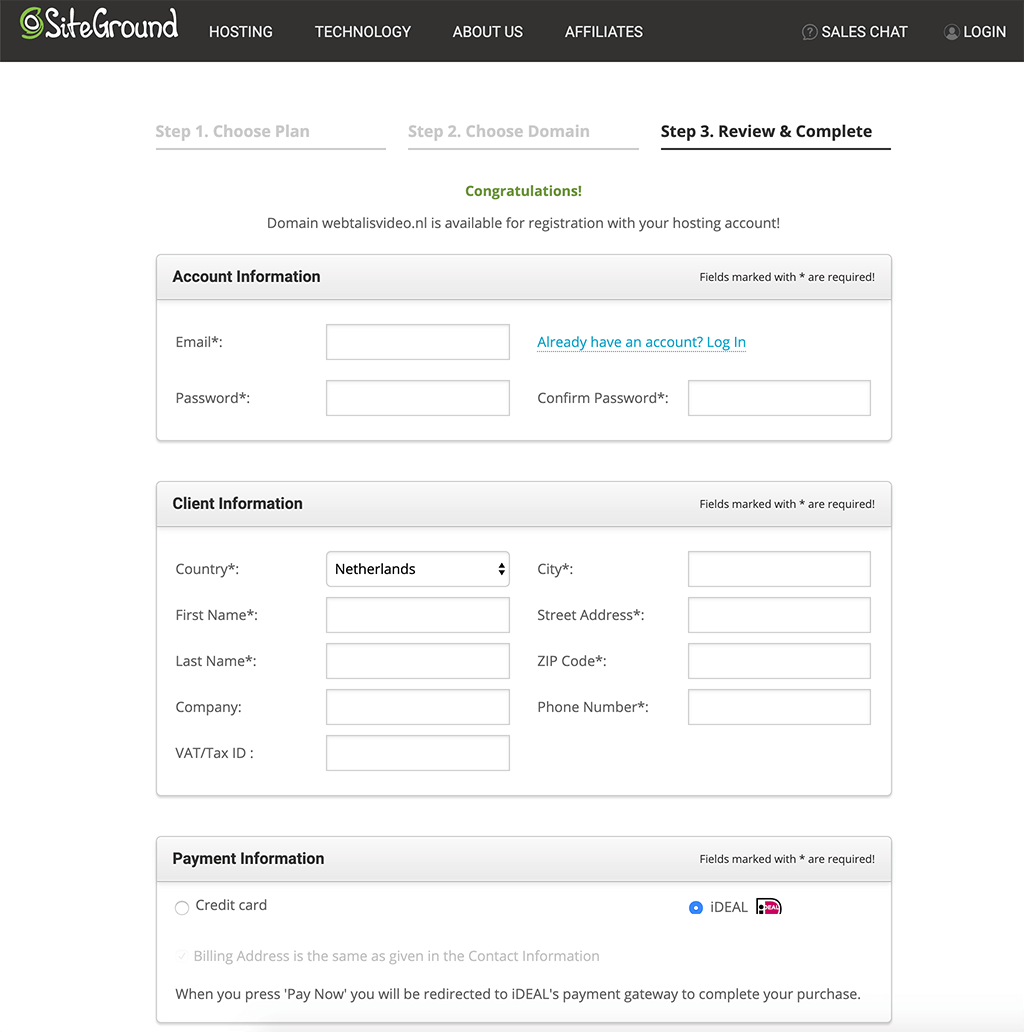
It speaks for itself what you can do here. At Account information, you can enter the details you want to use for your SiteGround account in the future.
Then you can fill in the invoice details under Client Information. If you have your own company and, therefore, a VAT number, you do not have to pay VAT for your hosting and domain name.
At Payment information, you can indicate which payment method you want to use. By default, it is set to Credit card, but with a simple click on the button, you can indicate that you wish to pay with iDEAL. You will be redirected as soon as you click on “Pay now” further down the page.
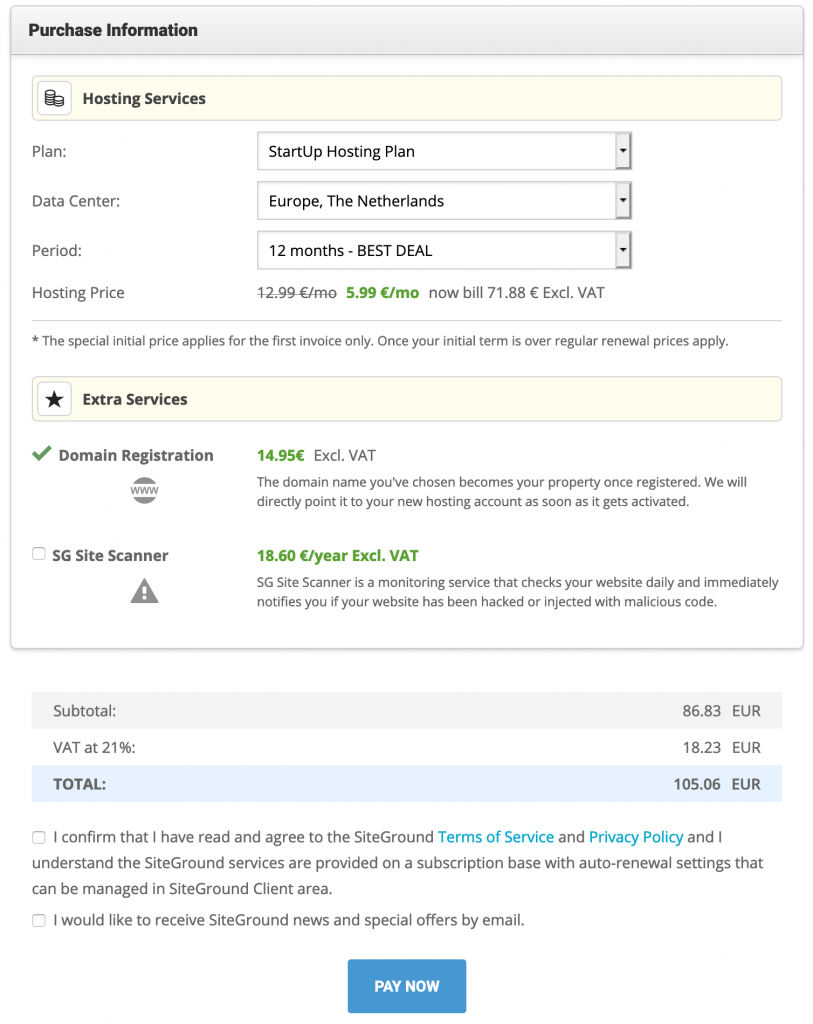
At Purchase information, things start to get interesting. Here you see the package you have chosen to create a WordPress website on later.
At Plan, you see the selected package. If you are satisfied with your choice, you do not need to change anything here.
Under Data Center, “Europe” is selected by default. This means that the server is located in Europe. You also choose data centers in the United Kingdom, Singapore, and the United States. For example, if you want to target an American audience with your website, you can change the data center and choose the USA option.
At Period, you can specify how long you want to take hosting. This is mega interesting when it comes to the 60% discount. The discount at SiteGround is only valid during the first contract period. After that, it changes to €12,99 for StartUp, €22,99 for GrowBig, and €34,99 for GoGeek.
To save as much money as possible with hosting in the long run, you can select a long contract period. You have the option of 1, 2, or 3 years. With 3 years 60% discount you will, of course, save the most money. Decide for yourself whether you want to create a website for a long, short, or unknown time not and base your choice of duration on that.
Under Additional Services, you will see “Domain registration” if you have chosen a domain name. This is all good.
Furthermore, you have the option to use the “SG Site Scanner” service. This is a scanner that checks if your website has been hacked or any malware on it. I personally never enable this option, and often enough, it is not needed.
Finally, you will have to agree to SiteGround’s terms and conditions and privacy policy. You will also have the option to indicate that you would like to receive news and special offers from SiteGround in your e-mail, but this is not mandatory.
Your order is now complete. Click on “Pay now” to make the payment, so you can start creating your WordPress website in a moment.
Just a short while to go before you can create a website
Once you have made the payment, you will be shown the page below.
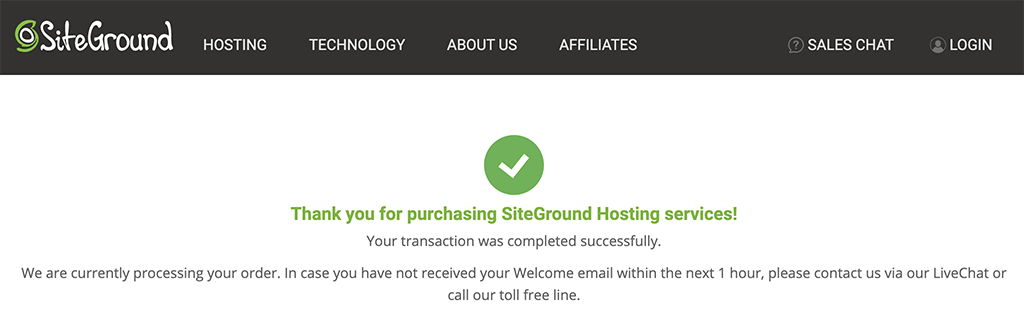
Everything has succeeded, and your order is being processed. It can take up to one hour before you can get started. This time is needed to register your domain name, call it visible, and link adequately to SiteGround.
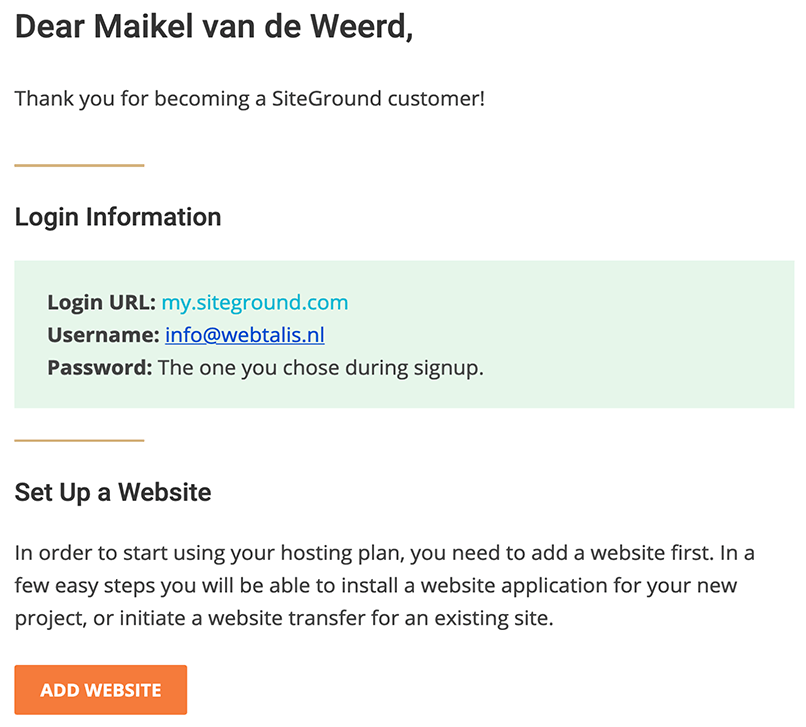
You will automatically receive a welcome email from SiteGround with information about your account and a link that allows you to start a website. This email will look like this:
How do I know if my domain name is active?
Apart from the above mail that you usually get when everything is working correctly, you can check if your domain name is active. All you have to do is enter your domain name in the browser.
In the picture below, you see that you get to see if the domain name is active and working on the left side of the page. You know what it looks like (depends on your browser) when the domain is not active on the right side.
Once your domain name is active, the real work can finally begin. I am creating a website! So it’s time for step 2, installing WordPress so we can create a WordPress website.
Step 2: Install WordPress
Super your domain name is active. Your website creation can now begin. To get started, you can install WordPress through SiteGround. Go to the SiteGround website and log in to your account.
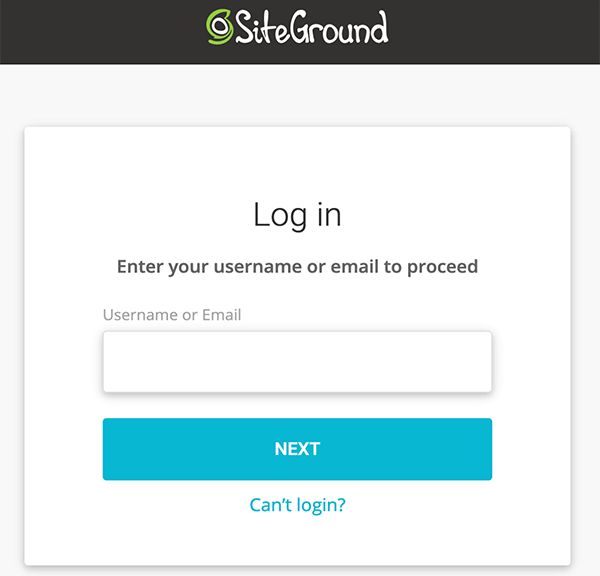
Enter the username (your email address) and password you created during your order. Once you are logged in, you will see the page below:
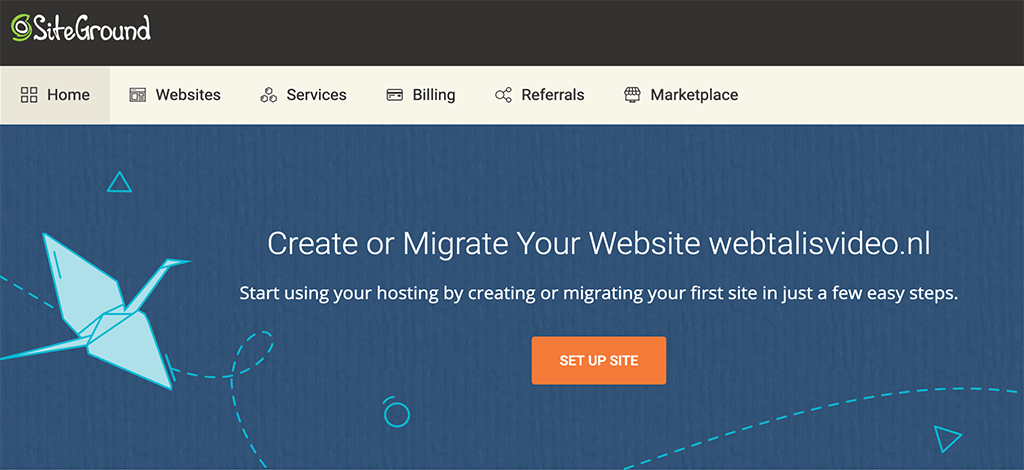
Here, click on the orange Set Up Site button to create a website. Another option is to click on “Websites” at the top and click through to your domain name.
We are now given the option to install WordPress with a few simple clicks.
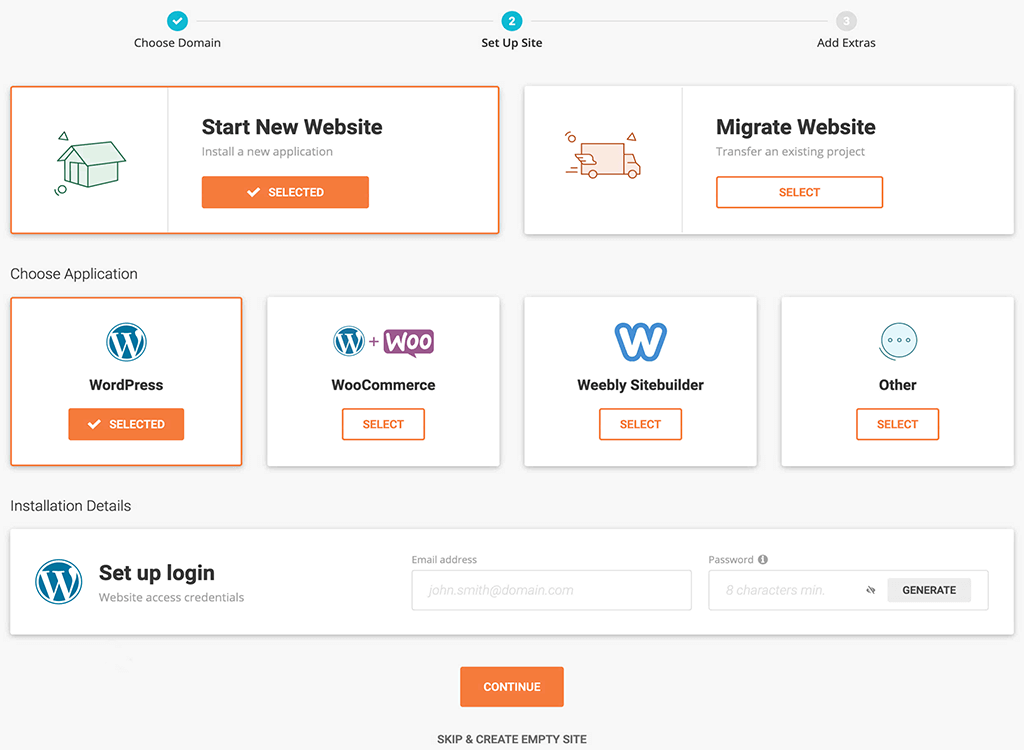
When we want to install WordPress, we first click on “Start New Website” here. Then at “Choose Application,” you can choose WordPress.
At “Installation details,” you can then enter your email address and generate a password. These will be the login details for your WordPress website.
When you have filled out everything, you can click Continue. The software “WordPress,” which we use to build a website, will now be installed.
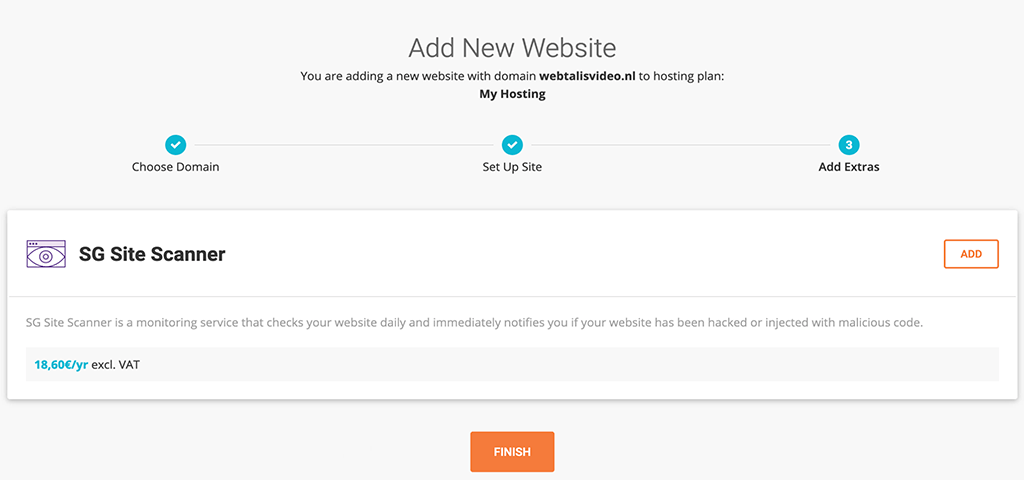
You will now be given the option to add the SiteGround Site Scanner to the website. This is unnecessary, so we don’t do anything with this and click the Finish button.
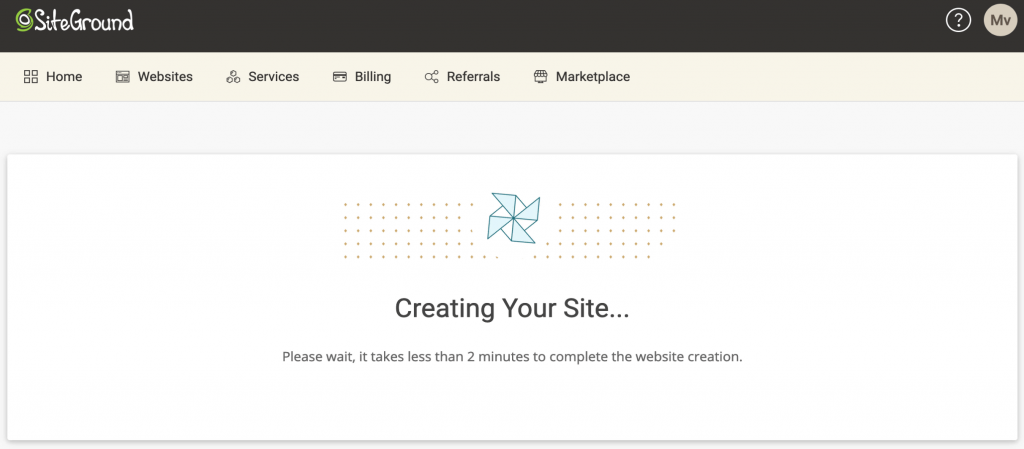
SiteGround will now start working for you and install WordPress with the login details you provided. You don’t have to do any technical work to install the software; you need to create a website. This is, of course, ideal.
WordPress installation may take a little longer.
It sometimes happens that you get a message that the installation takes a little longer. Usually, this is still done within 5 minutes.
All you have to do is be patient for a while, and then you can get started without any problems. You will receive an email as soon as SiteGround completes the automatic WordPress installation. So you don’t have to keep paying attention.
If for some reason, the installation does not work at all, a ticket will be automatically sent to SiteGround’s support team. The building will then be done for you manually. So you will never have to install WordPress yourself.
Step 3: Secure connection website (SSL / HTTPS)
A secure connection is super important to have these days. It has even become mandatory due to the General Data Protection Regulation (AVG) when personal data is entered or stored through your website.
With a secure connection, you prevent malicious persons from reading the traffic of your website. This is because a relationship goes through HTTPS, which is an encrypted connection. With an HTTP connection, everything that is sent between the browser and a visitor can be read by third parties. Of course, this is not possible, but with certain tricks, it is possible.
So we need an encrypted connection. Even if you don’t process personal data and only have a form on your website, I recommend it.
By the way, it has now even become a ranking factor in Google. So it pays off from all sides to have everything done through a secure connection.
Whereas some providers charge money to purchase an SSL certificate, SiteGround does so completely free of charge.
Installing an SSL certificate on a domain name
To enable HTTPS on your new WordPress website, you will first need to activate an SSL certificate. Fortunately, via SiteGround, this is very easy.
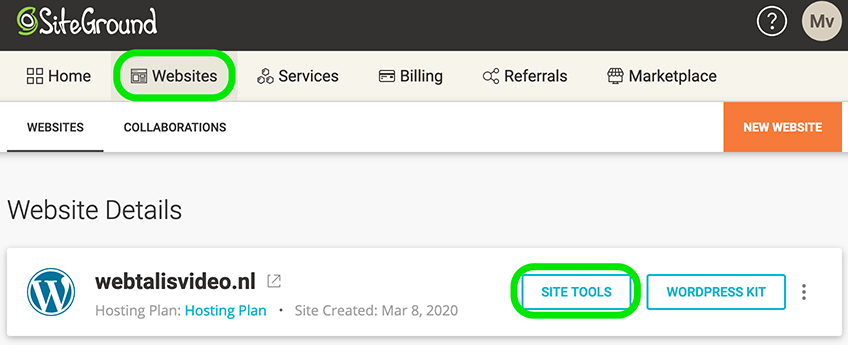
Go to your SiteGround account and then the “Websites” tab. Here you can go to the Site Tools of your website’s domain name.
You will now land on an overview page. In the menu on the left, you can go to Security and then the menu item SSL Manager.
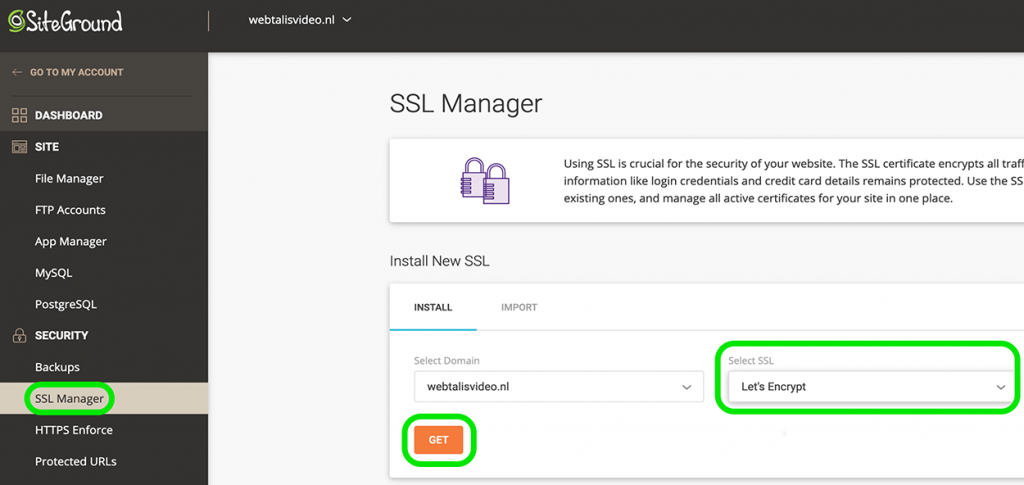
On the SSL Manager page, you can install a free SSL certificate for your domain name. First, select your domain name at “Select domain.”
At “Select SSL,” you will then be given the options of Let’s Encrypt, Let’s Encrypt Wildcard, or Premium Wildcard. You can choose Let’s Encrypt here.
If you want to use subdomains, then the Let’s Encrypt Wildcard is also a good option. The wildcard version activates SSL directly on subdomains as well. The Premium Wildcard is a paid version. With this certificate, you get an insured guarantee of $10,000. However, in many cases, this is not necessary. So I would go for the free version.
Once you have chosen your SSL type, you can click GET to have the SSL certificate installed. It is now just a matter of waiting for the installation to be complete. This will only take a few minutes at most. You will then see on the page that the certificate is active.

Now it’s nice that we have an SSL certificate, but our website doesn’t do anything with it yet. We still have to do two things. We need to indicate that everything should run through an HTTPS connection, and it would be nice if everything in the database of WordPress would also be correct with HTTPS in the URL.
Forcing HTTPS connection
To force all connections to go through HTTPS, we can set something else in SiteGround. Under the Security heading, go to HTTPS Enforce.
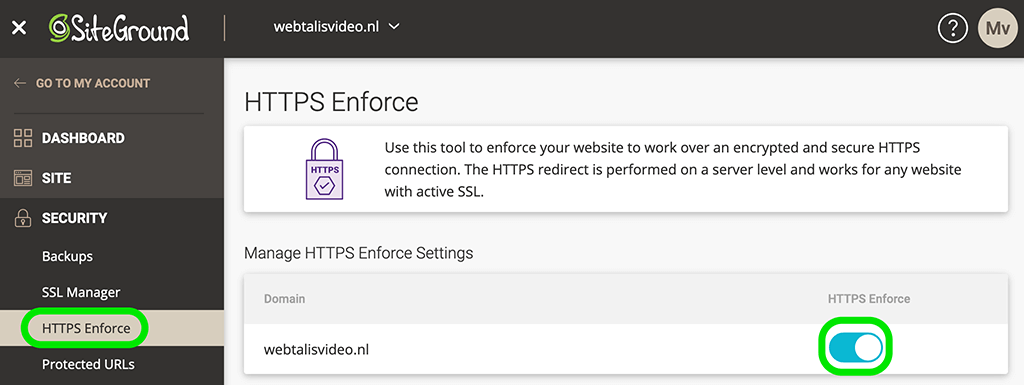
On this page, you can specify that everything should run over an HTTPS connection at the server level. This setting overrides your website. The only thing you have to do is to turn it on. You do this by setting the option to “blue” under HTTPS Enforce, as shown in the image above.
You are setting HTTPS on your new WordPress website.
To have everything set up perfectly, we still need to make a small change to our brand new WordPress website. It’s best to do this right away because otherwise, you’ll have to do some technical work in the database to switch all the URLs to HTTPS. When you do it right now, this is fortunately not necessary.
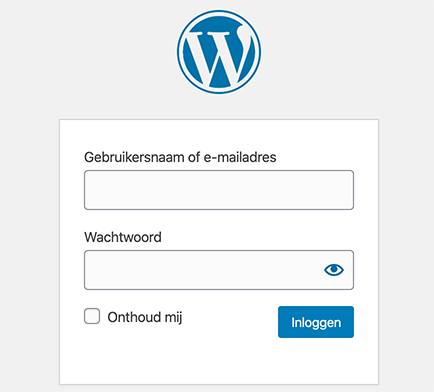
In other words, it’s time to log in to our website finally. Yes!
You can log in to WordPress in two ways. The default way is to go to yourdomainname.com/wp-login.php. You can enter your email address and password here to log in.
Another way is to log in through your SiteGround account. Go to “WordPress” and then Install & Manage.
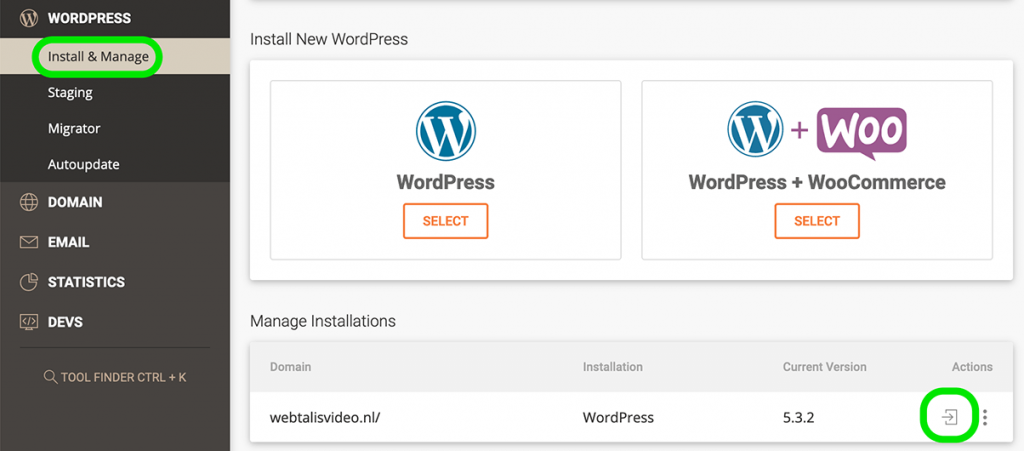
You can manage your WordPress installation here. On the right side, you will see an icon that allows you to log in. Click this to log in to your WordPress website automatically. The step to enter your login information will be skipped.
Note: When you log into your website for the first time, you may very well end up on the WordPress starter page first. I cover this page in the bit below (Setting up WordPress). You can skip it if necessary by clicking “Exit.”
Once logged into your WordPress website, we will immediately make sure that we set HTTPS for your domain name. To set this up, we can go to Settings -> General.
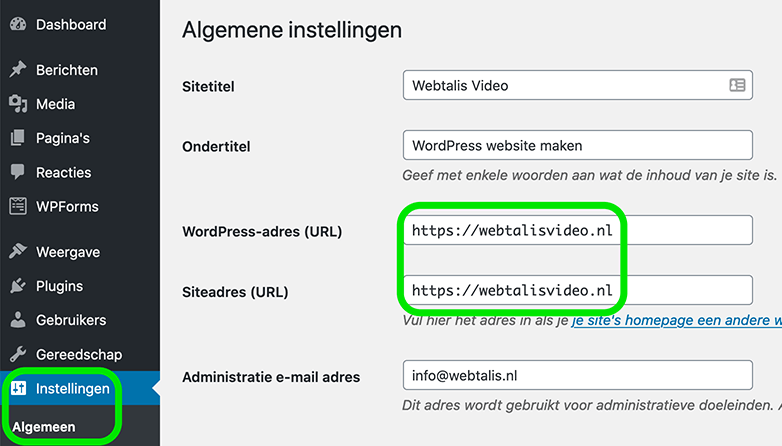
On the general settings page, you will see WordPress address (URL) and Site address (URL). In both URLs, you will see HTTP://. Change this to HTTPS://. Then scroll down the page and click Save Changes.
You will now be logged out of your website because the URL has changed. This indicates that you did it right. Log back in again to continue. We will now go to step 4. You are setting up all the WordPress stuff. Creating a website is just a lot of setup work in the beginning.
You may also like Unveiling the Top 5 Hosting Providers for Online Casinos: A Comprehensive Guide
Step 4: Setting up WordPress
Setting up your WordPress website is best done right away. You don’t have to change anything later on or fix things because they were not quite right.
SiteGround WordPress Starter
First, let’s go to the moment when you first log into your WordPress website. You will now land on the WordPress Starter page with which SiteGround tries to help you directly during the beginning of creating your website.
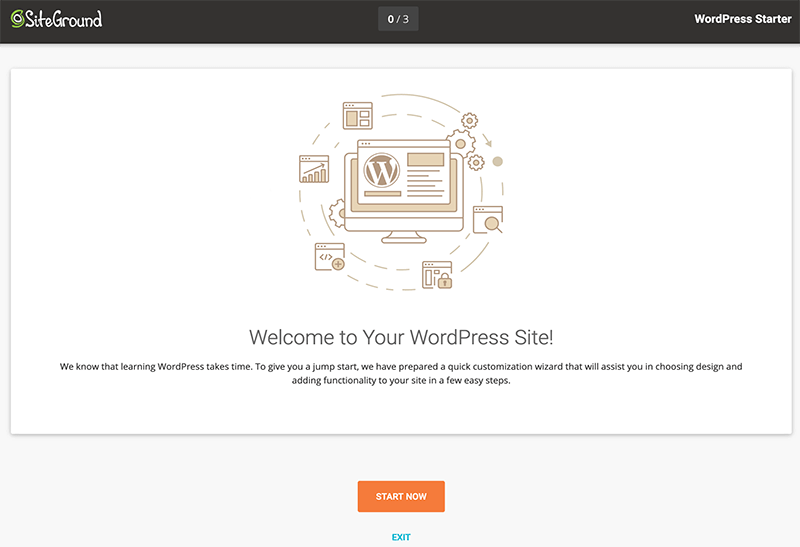
You are not required to get started with this, but it does allow you to install several essential plugins easily.
Click “Exit” if you do not need this setup wizard. Click on Start now if you want to continue. When you click Start now, you will be given the option to install a theme.
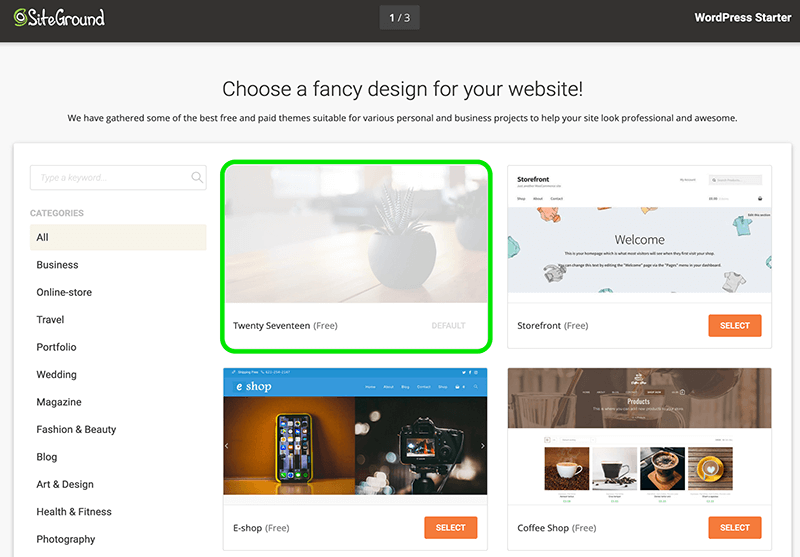
The theme we are going to use is unfortunately not listed here. So you can click on the default theme that is already selected.
Then click Continue at the top right to proceed to the next step in this setup wizard. We now get an overview of features that might be useful for your website.
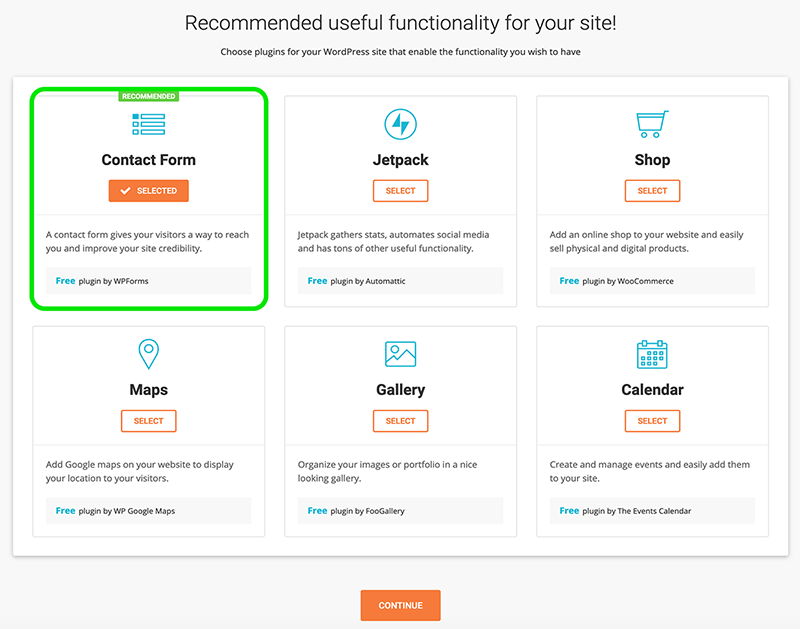
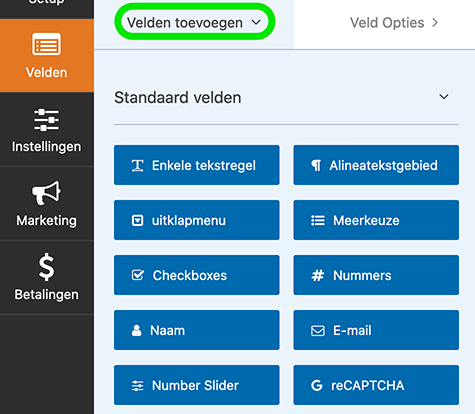
Of course, I don’t know exactly what kind of website you want to create and precisely what functionalities might be helpful for that. What I can tell you is that a contact form applies to every website. So select Contact Form and any additional plugins you want to use and click “Continue.”
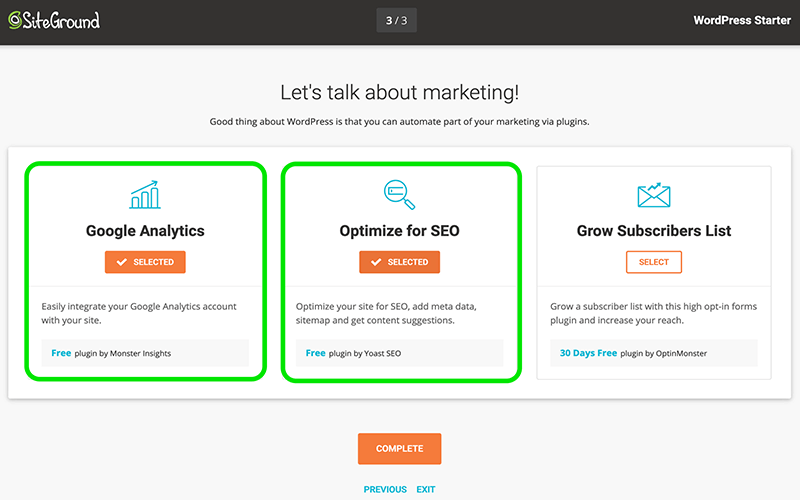
You will now have the opportunity to install various “marketing” plugins. If you want to keep track of the statistics of your website, Google Analytics is often the best choice. You can select it here. For search engine optimization (SEO) of your website, Yoast SEO is excellent. I use this plugin myself as well.
The third option you get here is OptinMonster. A paid plugin that you can use for free for 30 days. I wouldn’t turn this one on just yet. In the future, though, this plugin will be handy to build your mailing list for your newsletter.
When you choose, you can click “Complete” to complete the WordPress starter and have the plugins installed. You will then emerge into the WordPress dashboard.
WordPress Settings: General
Initially, everything will be in English. To do this, we need to go to “General -> Settings.”
Below you can see the page with the general settings of WordPress already in Dutch. In the image, you can see how I configured it. Below the picture, I will explain precisely how you can set it up and what it does.
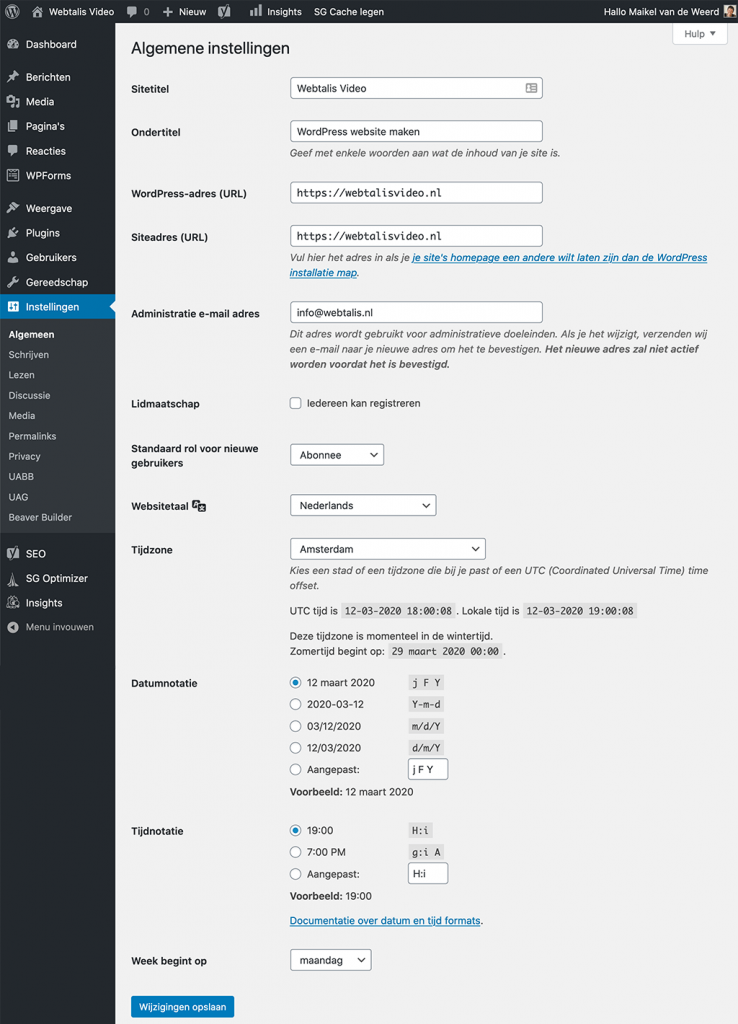
Site title: Here, you can enter the title of your website. This title will be shown on the top left when you are logged in. Also, this can be used by Yoast SEO as a site title. The site title is just the name of your website.
Subtitle: The subtitle allows you to describe your website in a few words. It may be that the subtitle will be displayed somewhere on your website, but with many themes, this is not the case.
WordPress address (URL): As you have already read above, you could ensure that the domain name in the database is always HTTPS. The WordPress address always shows the location where WordPress is installed. So do not change this just like that; you will get into trouble.
Site Address (URL): The site address is slightly different from a WordPress address. The site address is the address where visitors can find you. So, in this case (and in almost all other issues), the address is the same because the WordPress installation is in the exact location.
Administration email address: This will be the email address you entered when creating your WordPress login credentials. You will receive notifications from WordPress at this email address. For example, emails when a new user is created, an automatic update is installed, comments are waiting to be reviewed, and things like that. So it’s essential to enter your best email address here.
Membership: Here, you can specify whether visitors to your website can register. By default, this is usually not intended.
Default role for new users: Are visitors allowed to register on your website? Specify here what kind of user role you want to give people. Subscriber is the role with the most minor rights and usually the right one. By the way, at a later time, you can always change the part peruse.
Website language: What language are you targeting with your website? This is the language you need to enter a website language.
Time zone: When you publish or want to schedule posts on your WordPress website, WordPress will stick to the time zone you have set. So choose the time zone of your target audience here. You don’t have to mess up UTC+0 or anything like that; you can just select a city with the correct time zone.
Date Notation: Here, you can specify how the date should be displayed on your website. If you focus on the Netherlands, then “day month year” is best.
Week starts on: You can specify here on which day you want the week to start. What you set here is usually used by calendar/event plugins.
Finally, click Save Changes to make all your changes.
WordPress Settings: Writing
When you’re done with the general settings, we can move on to the settings for writing. Go to Settings -> Writing.
You will now see the following page.
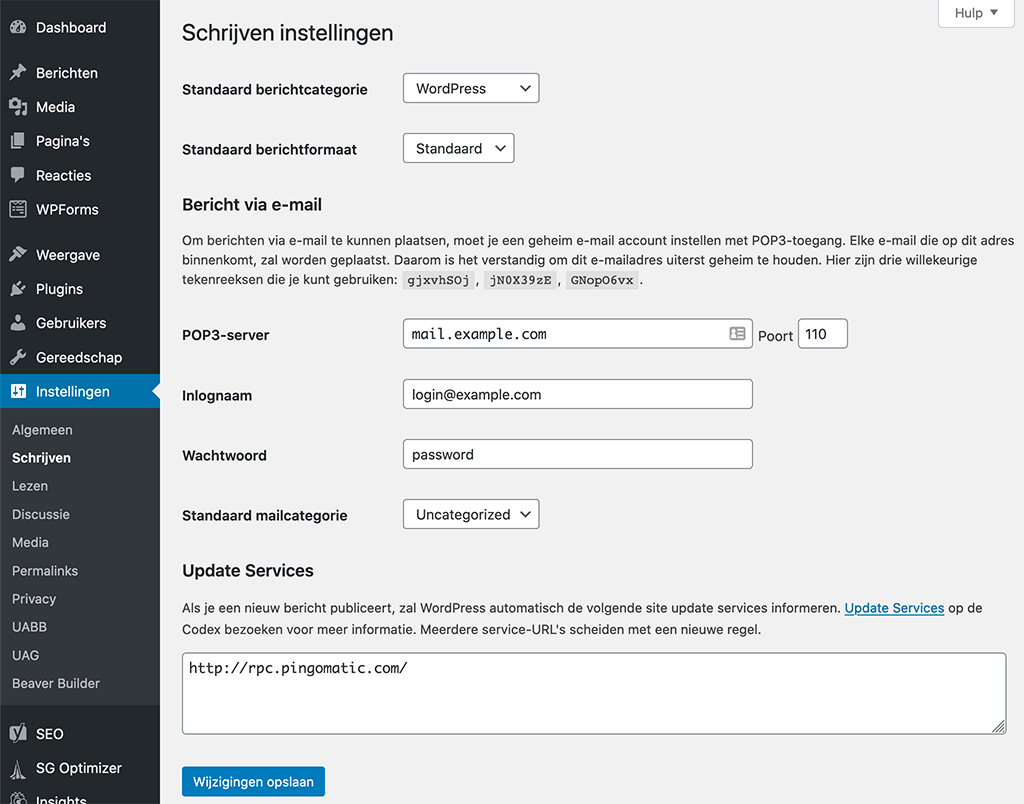
Default message category: Under this heading, you can indicate which type on your website you want to use as the default message category. This is only applicable if you’re going to blog; otherwise, you don’t use classes.
Creating categories in WordPress
We haven’t created any categories yet, so I’ll explain directly how to do this. To do this, go to “Posts -> Categories.
You will now land on a page with an overview of your categories on the right, and on the left you have the option to add a category.
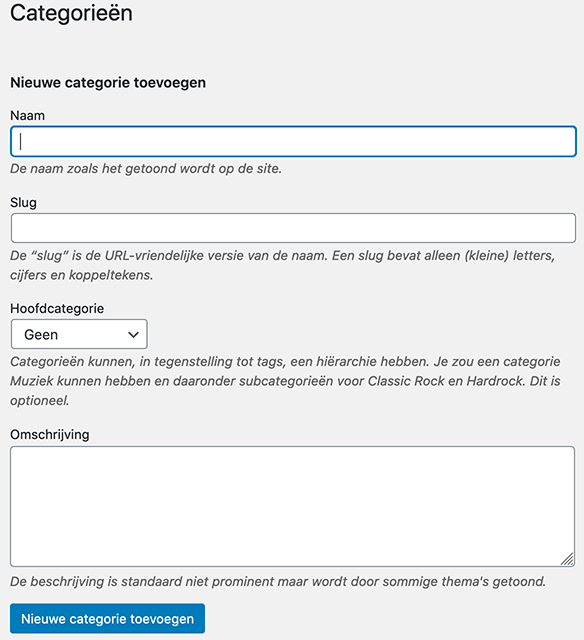
The only thing you have to fill in here is the name of the category. If you don’t fill in anything at Slug, then a slug will be automatically created based on the category’s name.
Should it be a subcategory, you can choose the category of which this is a subcategory under Main Category.
The DescriptionDescription is simply a brief description of what the category is about. The DescriptionDescription is not shown on many themes, so it is not always worth filling it in. When you have filled everything in, you can click Add New Category to create the category.
Okay, back to the Default message category. You can enter a category here that you want to use by default. When is this? The default post category will be used as soon as you create a post for your blog and you forget to set a category.
Default message format: It varies from theme to theme which message formats are available. In general, it is wise to keep it at “Standard” because it is on almost all websites.
Message via email: To add notes via email on your WordPress website, you can set up a secret email account with access through a POP3 server. Any email that comes in through this email address will be posted as a message. So it is essential to keep this email address secret. The email address must connect to the POP3 server of your hosting provider. You will also need to create the login name and password through your hosting provider.
You only need to set this option if you want to post via your email address. I don’t know anyone who does this, but it might be a helpful option for you.
Update services: WordPress will automatically notify site update services as soon as you publish a new post on your website. By default, pneumatic is set. This is a service that informs different search engines. I never add anything extra to this.
However, clicking on the “Update Services” link will take you to a WordPress page with more URLs you could add.
WordPress settings: Read
We have now arrived at the “Reading” settings of WordPress. You don’t have to adjust very much here, but it’s important to know what it can do for you.
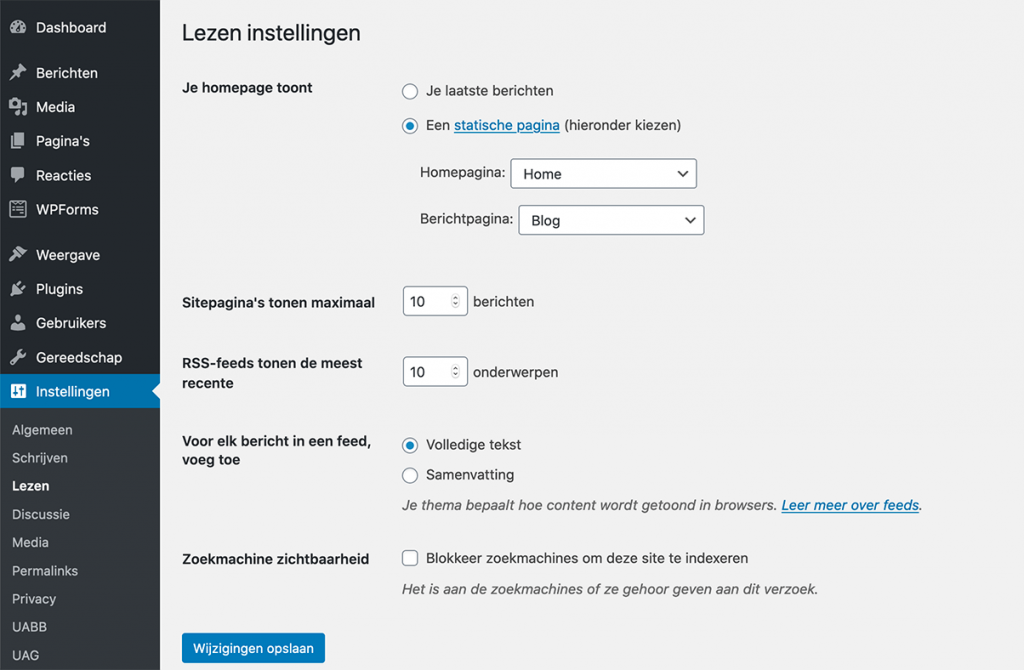
Showing your homepage: Here, you set what the homepage of your website should look like. You can choose whether to show the latest posts on the homepage or have a static page as the homepage.
At “Home page,” you can then select which static page should be the home page. On the “Message page,” you can choose which page you want to use to display your latest messages.
By the way, your theme may override these settings, but in many cases, what you specify here is leading.
Startpage show maximum: You can set the maximum number of posts you want to show on a blog and category page here. So if you’re going to show more or fewer blog posts, you will have to change this here.
RSS feeds show the most recent: For RSS feeds, it’s the same story as above. Now it’s just about the number of the topics (these are your articles) that you want to show in the RSS feed.
For each post in a feed, add: Here, you can set how much of the text is shown in your website’s feed. You can choose full text or a summary. The option you set here doesn’t make much difference in itself. Nowadays, feeds are not used very much.
Search engine visibility: This is an important option that you should stay away from! When you enable this, you indicate that search engines like Google are not allowed to view and index your website. You will not appear in the search results.
This option is only helpful if you want to keep your website hidden or are still in the development phase of your website. However, it is essential that you do not forget to turn it off when you are out of the development phase and go live with your website.
WordPress Settings: Discussion
On a website, it is super convenient to have comments enabled when you write blog posts. This way, you can communicate with your visitors. Under a post, you can see a comment field.
All settings related to this comment form and posted comments can be found in the Discussion settings. I will post the settings in 2 parts, as they are very many settings.
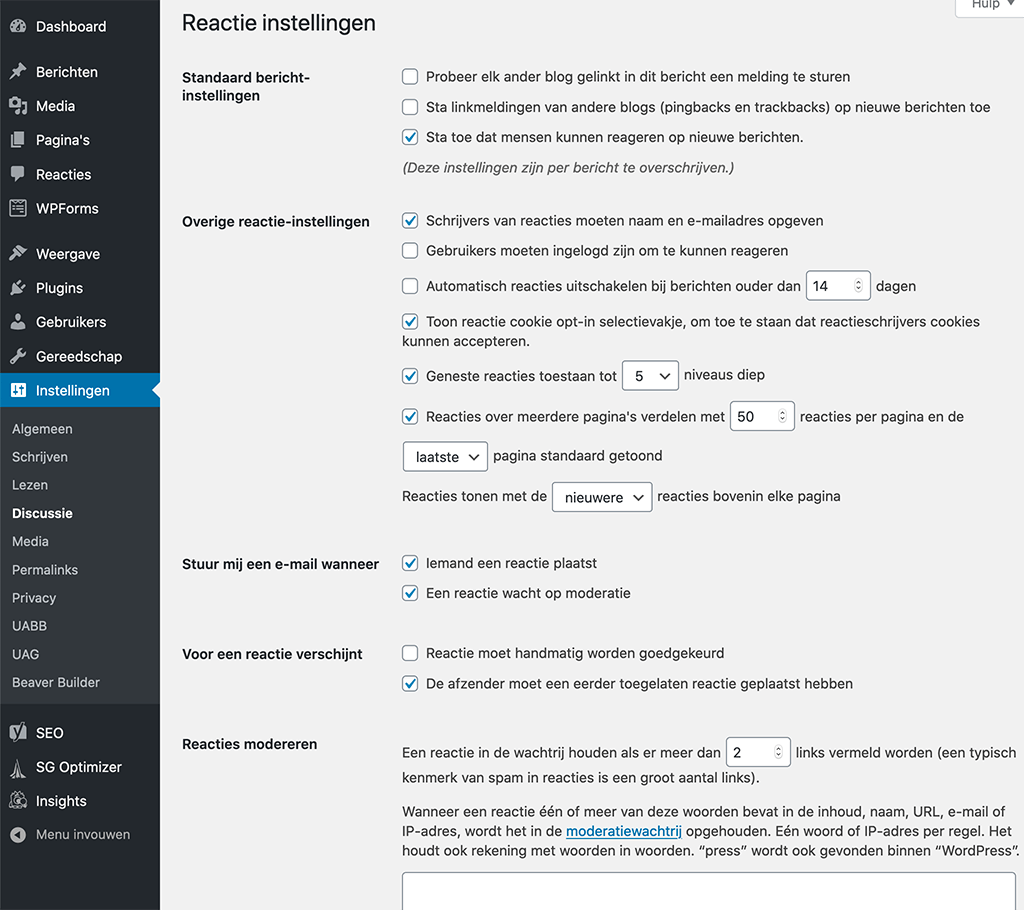
Default message settings: Immediately, here are 3 options that you can check and uncheck. The option “Try to send any other blog linked in this post a notification” ensures that when you mention another blog in an article, WordPress tries to access this blog and leave a notification.
The option “Allow link notifications from other blogs (pingbacks and trackbacks) on new posts” does the opposite of the option above. Your WordPress website keeps its ears open for mentions of your blog on other websites and then creates a notification on your website.
Both of these options are outdated, add almost nothing, and are hardly used anymore. It is, however, a popular tool among spammers. I, therefore, recommend that you disable both options.
The option “Allow people to respond to new posts” gives you the possibility to decide for your whole site whether to allow or disallow responses from now on. If you want to receive replies, you can leave this option checked. If you don’t like to receive comments, then you can leave this option unchecked.
Please note that this setting is only valid for new posts. For all old posts, you will still have to disable the WordPress reactions manually. An ideal time to set this right from the start now that you have started creating a WordPress website.
When you choose not to receive comments, you don’t have to go through all the other settings. If you have selected to receive comments on your website, read on.
Other Response Settings: The option “Comment writers must provide name and email address” allows you to require that comment writers leave a name and email address if they want to post a comment.
Do you want only logged-in users to be able to post a comment? Then turn off the “Users must be logged in to comment” option.
Suppose you want visitors to be able to leave a comment only for a specific time after the publication date. In that case, you can check “Automatically disable comments for posts older than XX days.” Also, fill in the number of days directly.
In the option “Show response cookie opt-in checkbox, to allow response writers to accept cookies. ” you can specify whether response writers must check something to accept cookies related to the responses.
The next option, “Allow nested responses to x levels deep,” has to do with the display. Nested responses are responses to responses. Ultimately, in this case, 5 responses can be made to each other. A good number as far as I’m concerned. More often doesn’t make it more excellent because themes generally cause all responses per level to become just a bit narrower.
When you get a lot of responses, the “Split responses over multiple pages with XX responses per page and last/first page shown by default” setting can be helpful. You can indicate here how many responses you want to split it over multiple pages. This can be a minor speed gain. In addition, you can also specify whether you want the last or first page to be shown first in the post.
You also have another practical option. For example, at “Show reactions with newer/older reactions at the top of each page,” you can decide whether you want to show the newest or oldest reaction first. You can make a different choice per type of website. On hosting fanatic, I offer the latest responses first.
Please send me an email when: Gives you the ability to control when you receive an email from WordPress. You can check this option if you want an email when “someone posts a comment” on your website.
If you need to approve a comment before it goes on your website, the comment will be queued for moderation. If you want to receive an email when a comment is in this queue, you can check the “A comment is waiting for moderation” box.
Before a response appears: Now we are at the settings that had to do with the above option. Do you want to manually approve all answers before they are visible on the website? You can then check the “Response must be approved manually” box. This can become a lot of work if you receive a lot of responses on your website.
The option “The sender must have posted a previously allowed comment” can already make things a little easier for you. You can approve the first comment of a commenter. When you approve this comment, the comments from this visitor will automatically be placed on your website without approval.
Moderate Responses: If you can moderate responses disabled, you can still have some influence thanks to this option. For example, you can indicate that if there are more than 2 links in a comment, a typical characteristic of spam responses, it will still go into the review queue.
You can also enter words that should not be used on your website before you approve the response.
This was the first part of the Discussion settings in WordPress. On to the sequel.
Blacklist: Want to move comments directly to the trash if it contains one or more words that should not be mentioned on your website? You can post the words that should not be used here. Please note that it is one word per line.
If you are experiencing a lot of spam through a particular IP address, you can also put the IP address on this blacklist to ensure that all responses go into the trash.
Avatars
On many WordPress websites, you see avatars in the comments. An avatar is a small image that a comment writer has linked to their email address. Check out the comment below as an example. The image of me is a so-called avatar.
So this image is linked to my email address and will show up on all WordPress websites. Do you also want to set up an avatar that you can see in comments with your email address? You can set this up through the Gravatar.com service.
Avatar Display: Here you can specify whether you want to display avatars at all in the comments on your website. For example, it may not really be applicable to display or you may have a website where it is nicer for people to remain private. In this case, it’s better to disable avatars.
You often know best what applies to your website.
Maximum Rating: While setting up a Gravatar, a commenter can indicate the rating of his or her image. For example, the avatar can be suitable for every visitor, for 18 years and older and a number of other things. You can indicate here which avatars you allow. For many websites this will be “G – Suitable for any visitor”.
Default avatar: The default avatar will be displayed when a comment writer does not have a Gravatar set for the email address used to write the comment.
For example, you can choose Mysterious person, no image at all, the Gravatar logo, or four other avatars that are generated.
WordPress Settings: Media
WordPress automatically creates different images when you add an image to your website. In the WordPress Media settings, you have an influence on how big the sizes will be and in which folder the uploads you make will be placed.
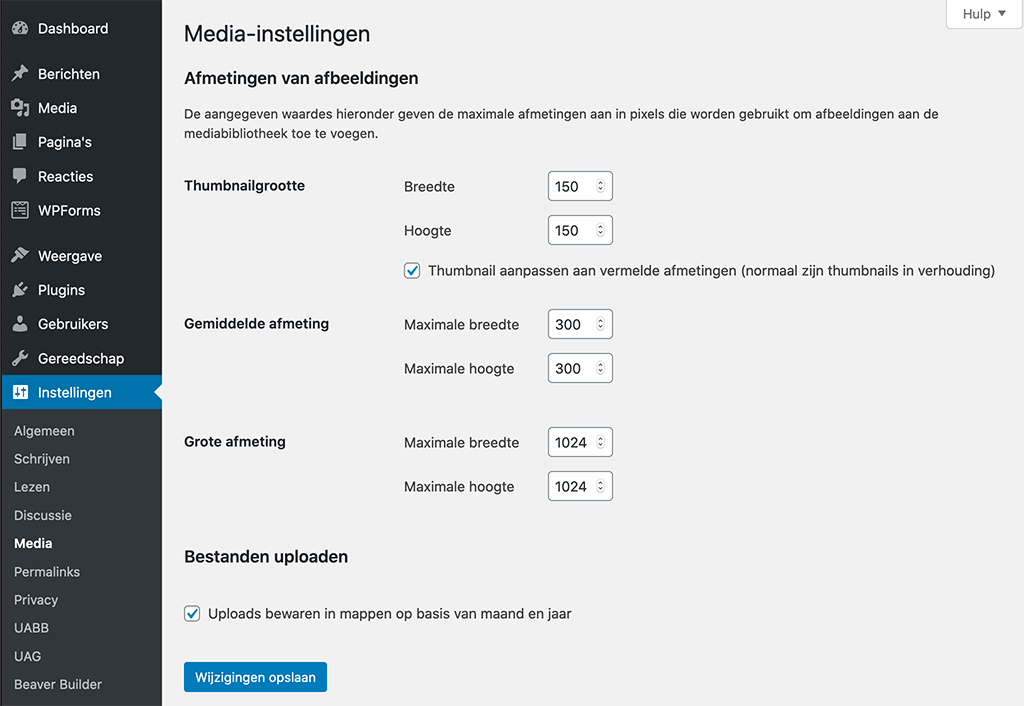
Image Dimensions: When you add an image to your website, WordPress also creates a thumbnail, average and large image for it. Exactly what sizes are created depends on how big the images are that you upload to your website.
For example, if you upload an image that is smaller than the large size, the large size will not be created.
You hardly ever have to adjust these settings. The theme you use always creates images that can be used for different purposes in the theme.
So adjust these settings only if you want to use these image formats yourself for a specific reason.
Uploading Files: Under this heading, you will see the option “Save uploads in folders based on month and year” checked by default. This ensures that all uploads are sorted by upload date. This makes it a lot clearer than when everything is placed in one folder. I would therefore leave this option checked.
WordPress settings: Permalinks
We have now arrived at the permalink settings of WordPress. Here are some necessary settings related to the URLs of your website. Namely, you can set how the URL will be structured. In other words, with what kind of URLs your visitor can get to a page of your website.
Creating your WordPress website is only helpful if you can eventually be found well. So it is essential to have the permalinks set up correctly right away.
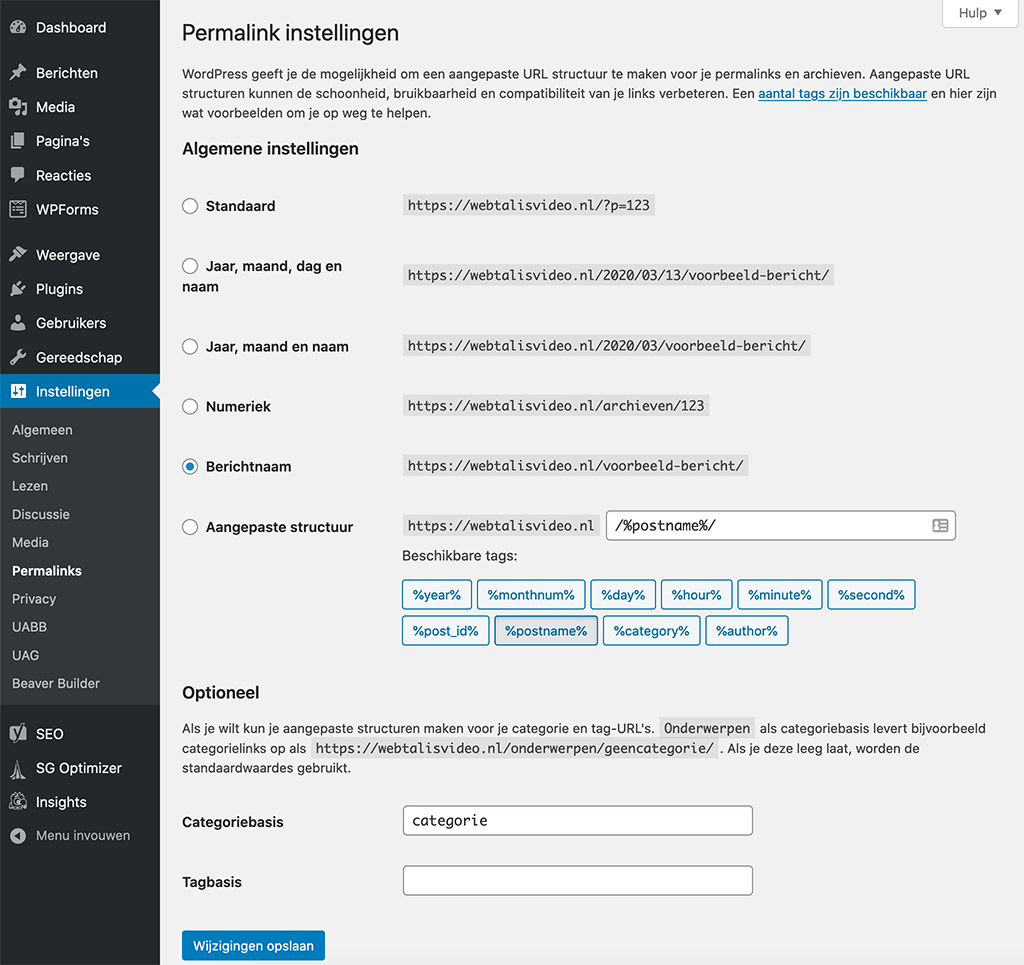
General settings: The general settings for permalinks allow you to determine the structure of the URLs on your WordPress website.
I would always go for message names. This is the most user-friendly and good for the search engine optimization of your website. If you like to have the date in it, you can choose “Year, month, day and name” or “Year, month and name.”
With a custom structure, you may also choose to add the category to the URL. You can then enter the following: /%category%/%postname%/.
I would not recommend setting the other two options anyway as they are bad for search engine optimization and do not tell the visitor what the article is about.
Optional: In the optional settings, you have a few more options that you may want to take advantage of. For example, you can change the category base URL. By default this is /category/category name/. If you don’t like this, you could enter something like “subject” at the Category base. The new URL will then be /subject/category name/.
In principle, you can leave this on the default; it is, therefore, an optional field. The default is fine.
For Tag base, it’s the same story. You can customize it, but it’s not necessary.
WordPress Settings: Privacy
Creating a website these days, unfortunately, does come with a few rules. When you have a website, you have to comply with privacy laws. You can specify what your Privacy Policy page is on this page, or you can create a new page here.
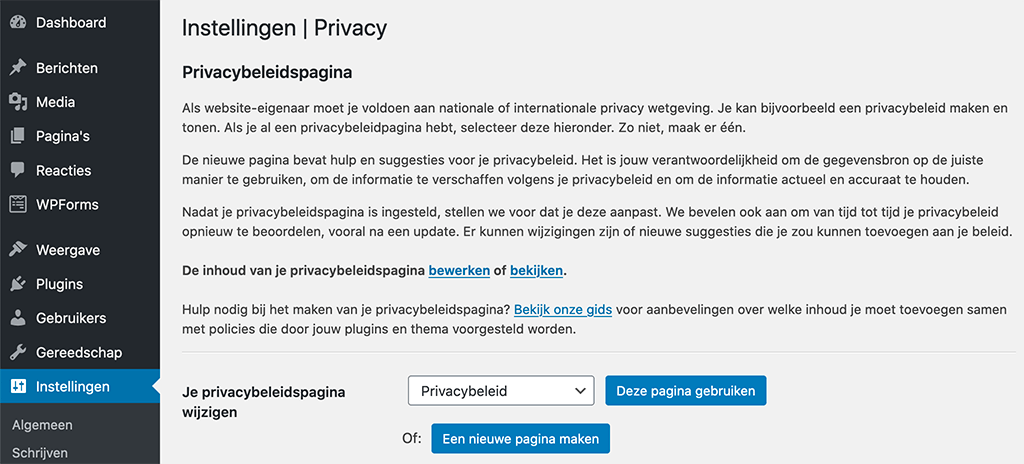
Every website needs a privacy policy that indicates what cookies are used and what happens to the data.
When you’re just starting with your website, you won’t do a whole lot. You might install Google Analytics or put a Facebook-like button on your website page and things like that. You will also have to provide information about this on a privacy page already.
If you’ve already arranged everything and created a page for this, you can set it up so that WordPress sees this as your privacy page.
Don’t have a page yet? Then click on Create a new page. WordPress will then automatically create a page with standard information that you can use as a basis. When you click on “View our guide,” you will get even more information about this topic from WordPress.
These were all the settings from WordPress itself. If all goes well, you will never have to look at these again from now on.
Step 5: Install Beaver Builder (plugin) and the Astra theme
Now that we have the settings behind us, we can start working on more critical parts. You will now really feel like you are creating a WordPress website. We will begin working on the design and the functionalities of your website.
So we will download and install the Beaver Builder plugin and the WordPress theme Astra on our website. The Beaver Builder plugin allows us to assemble and beautiful layout pages, and the Astra theme takes care of the design.
Install Beaver Builder (lite) plugin

Let’s start with the plugin Beaver Builder, which we will use as a page builder or page builder. There is a paid version that I recommend. It gives you a lot more options, and you can create beautiful pages with it. This page is also made with it.
However, you can also initially go for the free variant, namely Beaver Builder Lite. This is also a great starting point when you are just starting to create WordPress websites.
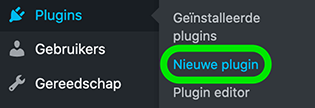
To install Beaver Builder Lite go to “Plugins -> New plugin.”
You will now land on a page to search for plugins in the official WordPress plugin directory. All plugins you can find here are free. However, a plugin may promote the paid version, which has extra features.
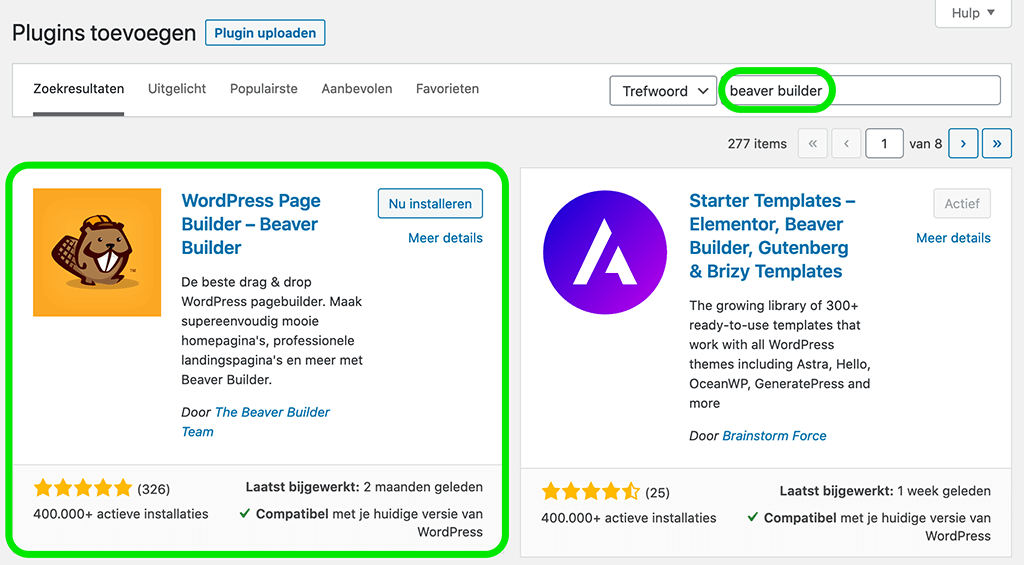
To install Beaver Builder, you can search for “Beaver Builder” in the correct top box. Once you have done this, it will search for you, and you will see the plugin as the first result.
Click on the Install Now button to install the plugin. You will then be given the option to activate the plugin.
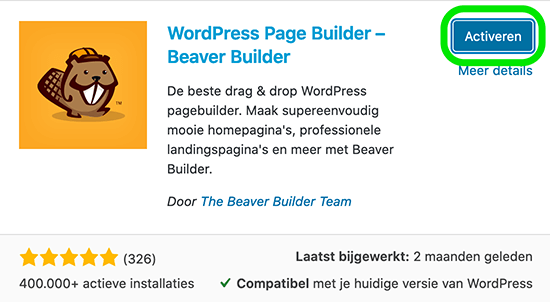
Activate the plugin by clicking the Activate button. You will now arrive at a welcome page of Beaver Builder. You can view the different tabs with information and choices. I don’t modify anything on most of the pages myself.
The only page I find interesting is the “Post Types” tab.
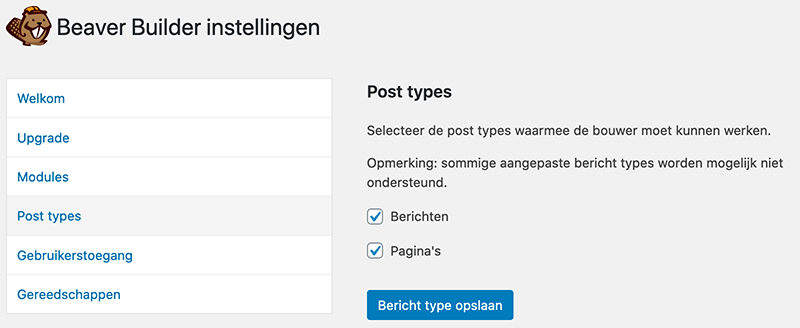
You can indicate here which post types you want to activate Beaver Builder. By default, only pages are activated, but if you’re going to use Beaver Builder for posts as well, you can check it here to enable it.
Furthermore, you may see more different post types here. This depends on the plugins you have installed and the theme you are using.
If you want to change certain things at a later time, you can always go to the settings of Beaver Builder by going to “Settings -> Beaver Builder” in the menu in the admin area.
So much for the first small steps with Beaver Builder. Now that this plugin is installed, we can install the Astra theme and pick a free template that works well with Beaver Builder.
Install Astra Theme
In WordPress, you use themes to customize the design of your website. We are going to use the free Astra WordPress theme to build a website.
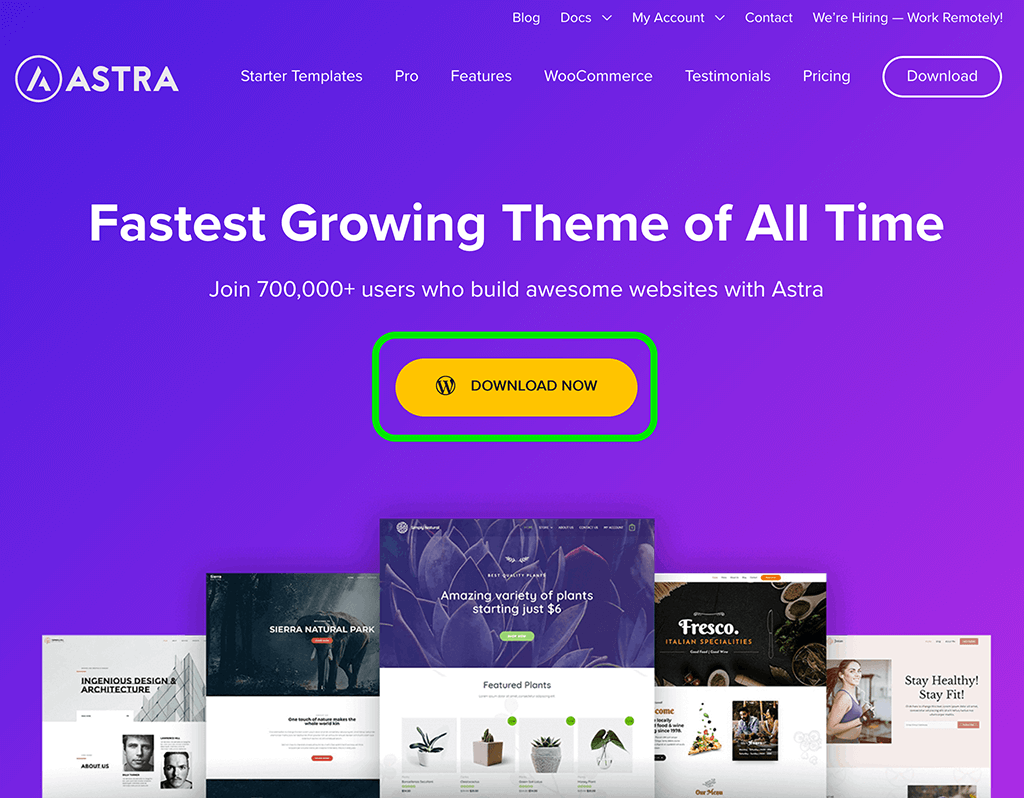
Once on the Astra theme website, you can click on the “Download now” button.
You will now come out on a page with different prices. We don’t need to do anything with this because we want to download the free theme. Scroll down a little further until you see the below.

Click on the text “Download Free Astra Theme” here. You can then leave your name and email address to be notified of news and discount codes, or you can choose to download the theme directly. Choose what you feel comfortable with.
Installing a WordPress theme
Now that we have the theme on our computer, it’s a matter of getting it on our website. We go to “View -> Themes” in WordPress and then click on Add New.
You will now land on a page of WordPress where you can pick themes that are in the WordPress Directory. The Astra theme is also listed here, but we can click “Upload Theme” since we already have the file.
Once you have clicked on this, a new field will appear.
You can now click browse, select the .zip file you have from the Astra theme and click Install Now.
It is now a matter of waiting for the installation to be complete.
Finally, click Activate to activate the Astra theme successfully. Now when you look at your website, you will see the default Astra theme design. Not very exciting, so time to pick a design.
Choosing a design (template) for your new website
We have options in the Astra theme that allow us to choose different designs and import them into our WordPress website. This makes creating a WordPress website a breeze for you and me.
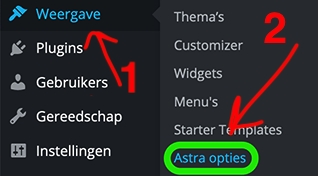
To choose an excellent design for your website in Astra, we can go to View -> Options.
On this page where you are now coming out, you can get to different parts of Astra easily.
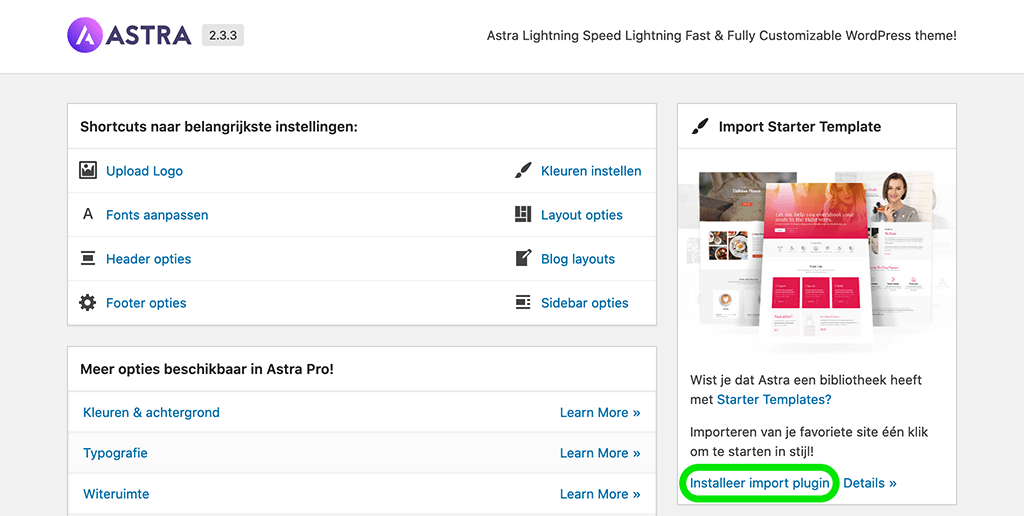
On the right side you will see a box labeled “Import Starter Template”. Here, click on Install import plugin to install the import plugin on your website.
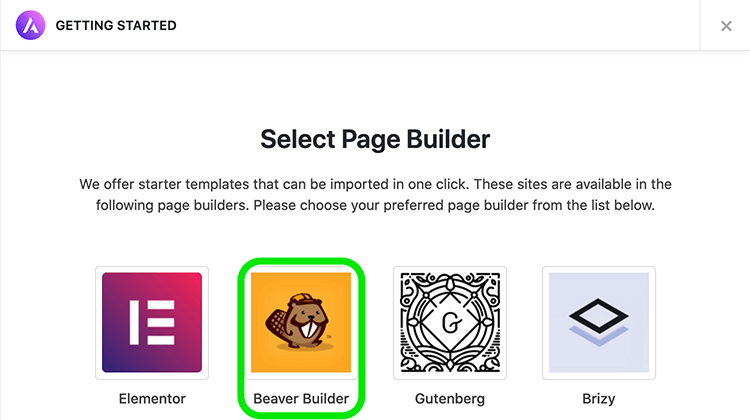
During installation you will be redirected to a page where you can select a page builder. Here we choose the page builder Beaver Builder, which we had just installed.
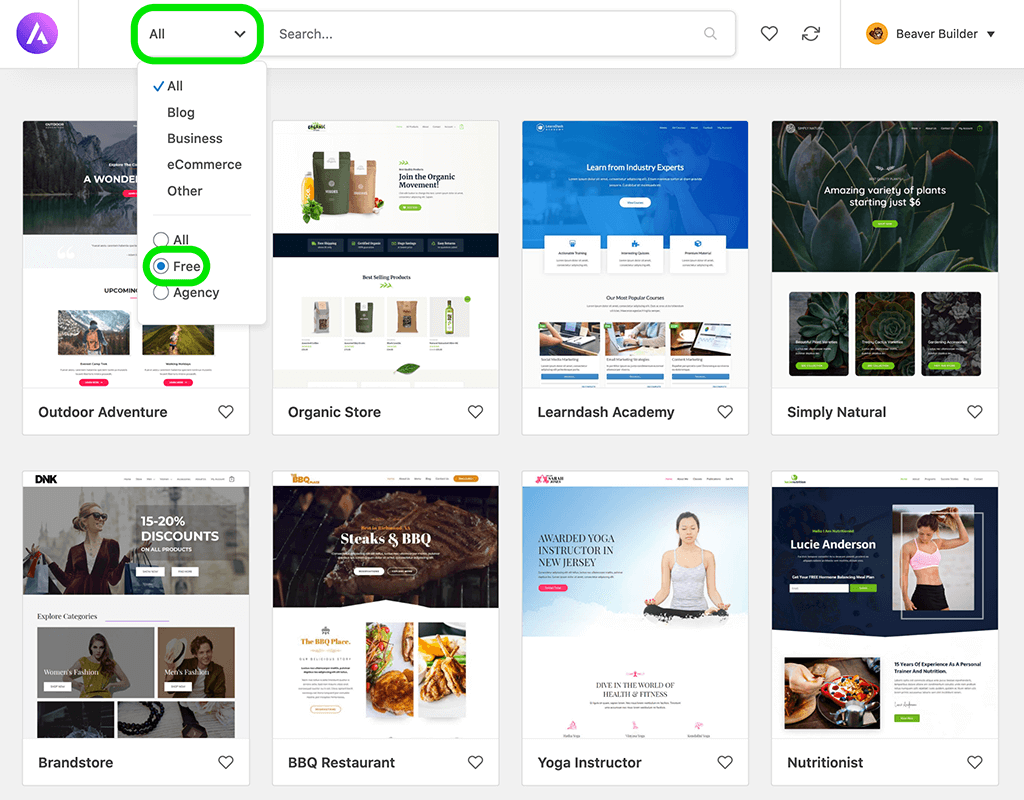
You will now be taken directly to a page where we can start picking a template (design) that we like and want to use to create our WordPress website.
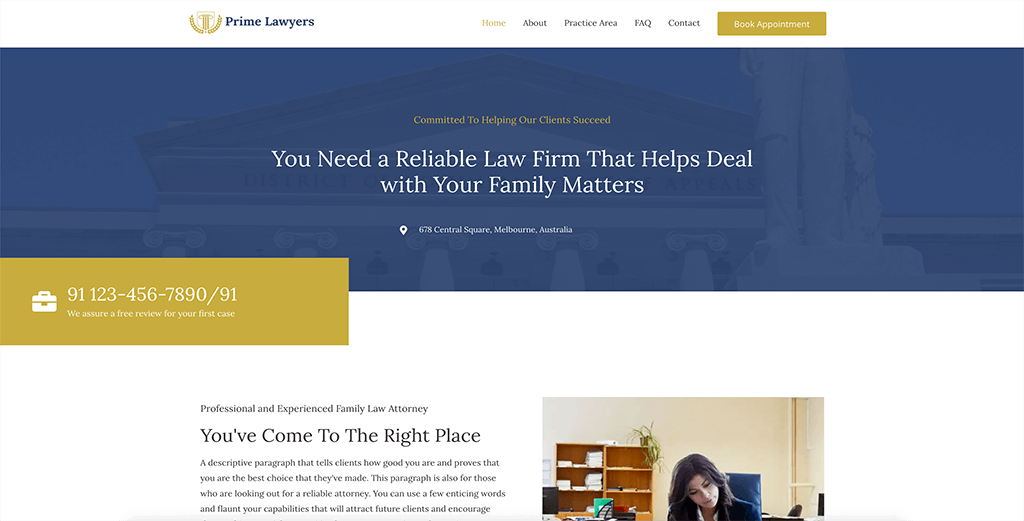
Scroll through the templates and feel free to click on them. In this example, I’m going to go with the template “Lawyer,” or lawyer theme. With this template, you get a homepage and pages like about me, services, FAQ, and contact—all very useful pages when you want to create a WordPress website.
You can, of course, use this template for other purposes as well, because we can make of it what we want. The important thing is that you like the design.
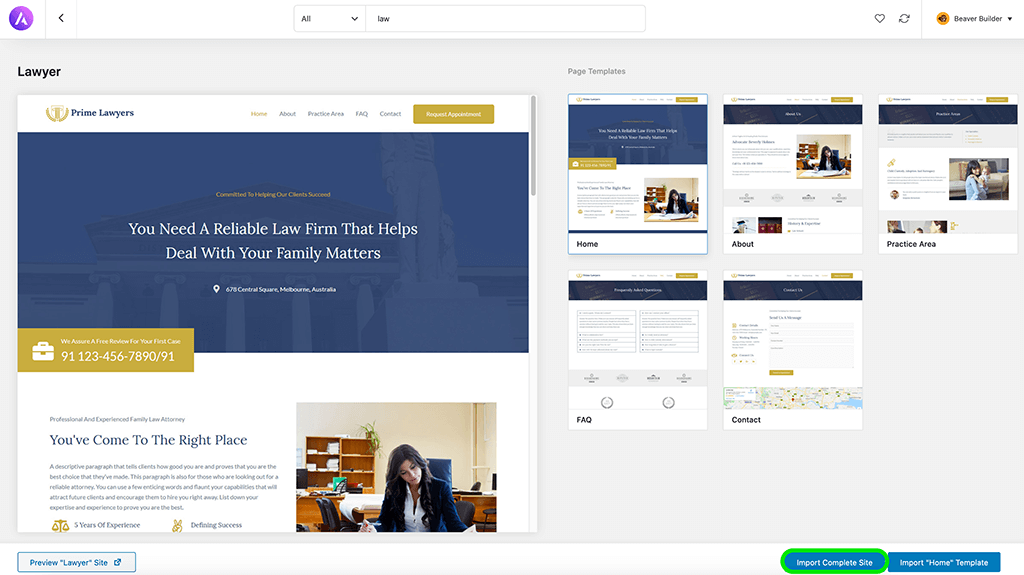
Before you import the template for your website, you can view examples of different pages that come with the template. It’s simply clicking on the page, and then on the left side, you can see the page as an example and also scroll down to see the entire page.
When you are satisfied with the design you want to use while creating your website in WordPress, you can click on Import Complete Site at the bottom right. You will then import all the pages into your WordPress website.
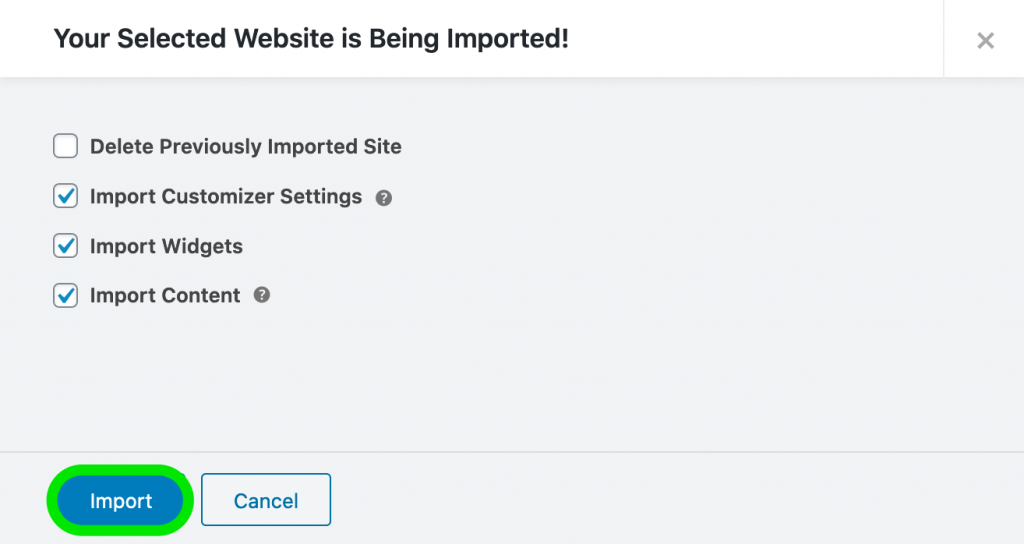
You will now be given the option to import the customizer, widgets, and content settings. If I were you, I would keep all of these checked so that you have a handy demo website that you can customize to your liking.
If you have imported a previous template that you are not satisfied with, after all, you can check the option “Delete Previously Imported Site.” This way, you remove everything related to the other template, and you can start fresh with your WordPress website creation.
When you have checked all the options you want, you can click Import. During the import process, additional plugins are often installed in addition to a new template. The plugins in this case are:
- Ultimate Addons for Beaver Builder (for more options in Beaver Builder)
- WPForms (for a contact form)
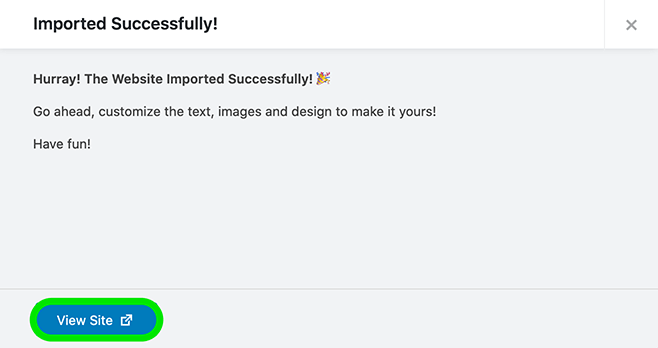
Once the import is successful, you will see the screen above. You can now click on View Site to see what your website looks like now. You will, of course, just see the template you just selected.
You’re finally starting to actually create your website. You now get to work on exactly what it will look like and can add content. The real things that come with creating and website with WordPress.
With me, it now looks like this. This is the point from which we will work now.
Step 6: Create and set up the WordPress website
As you can see from the image above, we really do have a website already. It looks super neat and professional. We already have several pages and a menu set up. We can edit all these pages to make sure that the website is completely according to our wishes.
Changing page titles of existing pages
We start with the page titles. The demo version has them all in English, but on a Dutch website, we don’t want this.
Go to the admin area of WordPress and then click Pages -> All Pages in the menu on the left side.
You will now arrive at the page with an overview of all pages.
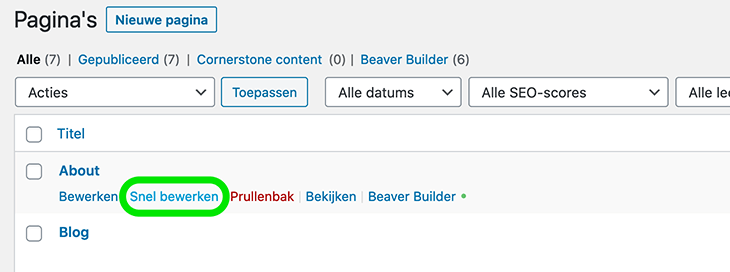
Now hover over a page and click on Quick Edit. This is the quickest way to be able to edit a page title.
At Title, you can now enter the name of the page, and at Slug, you can enter the URL you want to use for this page. When you have changed this, you can click on Update on the right (unfortunately, just outside the image).
Then repeat this process for all pages of your website so that everything is in English.
Because you have changed the page titles, you will see that the menu names have also been changed. However, you can still change a few things on the menu. Like the order of the pages and you can also create a submenu.
To customize the menu of your WordPress website, you can go to “View -> Menu” in the WordPress admin area.
You will now come to a page that looks something like the one below. You can customize several things there. I will, of course, explain to you how it works.

On the left side, you can add pages to the menu. Initially, you will see the most recent pages. However, you can also click on the tab “Show all” or “Search” to look up another page. Adding a page is otherwise easy. You can do this simply by checking a page and then clicking the “Add to Menu” button.
Furthermore, you also have Posts, Custom Links, and Categories. At Posts, you can add WordPress posts. In Custom links, you can create your own link. This can be to another website, for example. At Categories, you can make sure that you can place a category page in the menu.
Once you have added menu items, they will appear on the right side of the page. Here it is a matter of dragging and dropping to place the menu items in the correct order.
However, if you want to create a submenu for a particular menu item, you will have to place the subitems below the menu item and then a little more to the right. The result on the website will look like this.
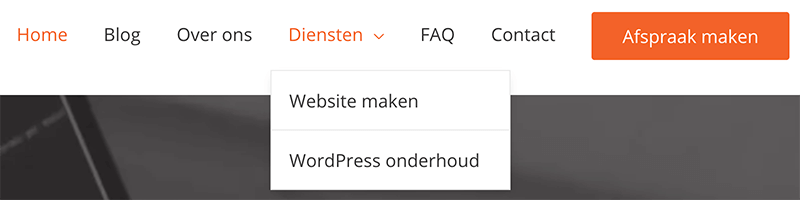
At the bottom of the menu settings page, you can specify the location where you want the menu to appear on your website. The Main menu, in this case, will be for the menu at the top of the website. The Footer menu is for the bottom of the website; you won’t be using this one soon.
Want to learn more about creating and managing menus in WordPress? Then check out the article WordPress menu creation and management.
Customizer settings in WordPress
To customize certain things, such as the logo, font, font size, and main colors you want to use on your website, you will need to go to WordPress Customizer.
The advantage of making adjustments in the Customizer settings is that you can see the changes live immediately.
To get to the Customizer, you can click “Customizer” on the front end of your website at the top of the menu. In the admin area, you can go to “View -> Customizer” to get there.
I will go through the most important Customizer settings with you. Be sure to click on the other things you encounter and set it up as you like.
In addition to a number of default options in the Customizer, it depends on the theme exactly which settings you get to see. In the case of the Astra theme, you get to see the following settings in the Customizer.
Global: At Worldwide, you can change things like the font and size, the colors, the width of the website, and the color and font used for the buttons on the website.
Header: At Header, we can add a logo, set a favicon, choose from different header variants, and have an influence on some things in the menu.
Breadcrumb: Breadcrumb allows you to set the position for the breadcrumbs on your website should you wish to use them.
Blog: If you want to have a blog on your website, you can set a few things here. For example, you can set whether you want to show the date, author, and things like that and the order.
Sidebar: In the Sidebar settings, you can indicate for which kind of pages you would like to display a sidebar and how wide the sidebar can be.
Footer: At Footer, you can control the bottom of your website. You can decide whether you want to place widgets (with links to pages, for example), the color of the Footer, and a number of other things.
Menus: Menus is a standard part of the Customizer. You basically don’t have to do anything here since we’ve already done this via “Display -> Menus.” So you just influence the menu here again.
Widgets: Here, you can add widgets to the Footer of your website, among other things.
Homepage settings: Here, you can define the page you want to use as your homepage, which you have already done at “General -> Reading.”
Additional CSS: This is for those with some technical knowledge. You can add CSS code here to reshape parts of your website.
Setting fonts through the Customizer
As you can read above, we need to go to Global to adjust the font of the website.
Once we click on “Worldwide,” we get the following options.
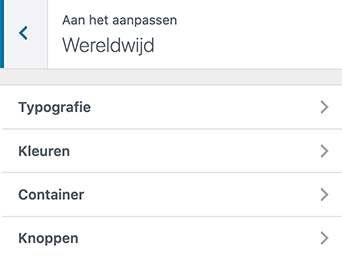
Everything is fairly self-explanatory. In Typography, we can adjust the font, in colors the colors, in the container it’s about the width of the website, and in buttons, you can adjust the font and colors of the buttons.
I will show how easy it is to customize the font. These are the settings you get for the font of the normal texts on your website.
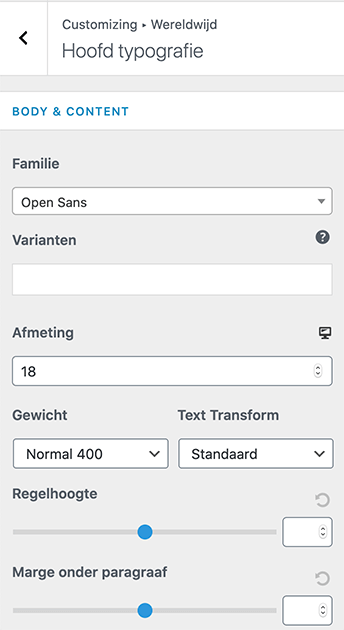
In Family, you specify which font you want to use. There are really more than enough to choose from. You can test the fonts by selecting a font and viewing the live preview of your website on the right.
At Variants, you can indicate which versions of this font you might want to use on your website. For example, you can indicate that you want to add bold, italic, and more.
At Size, you can select the font size. I have set 18 here, which stands for 18 pixels in Size.
Next, we have a number of options where I would leave the default settings. Purely because this is good enough and often does not benefit customization. This is so with the weight (thickness) of the letters, Text Transform (always lowercase, only uppercase, etc.), line height, and margin (space) under paragraph.
You are setting the main colors for your website.
Colors are very important for the look of your website, and visitors also recognize your website easily because of this. Furthermore, you can create peace and trust for your visitors. Are you still considering what colors are good for your website? You can check a website like Coolers. co to create a color palette for your website. I recommend you use no more than three main colors.
You can set the main colors you use in the Astra theme through the customizer. To do this, go to Global and then to Colors. You will then see the following settings:
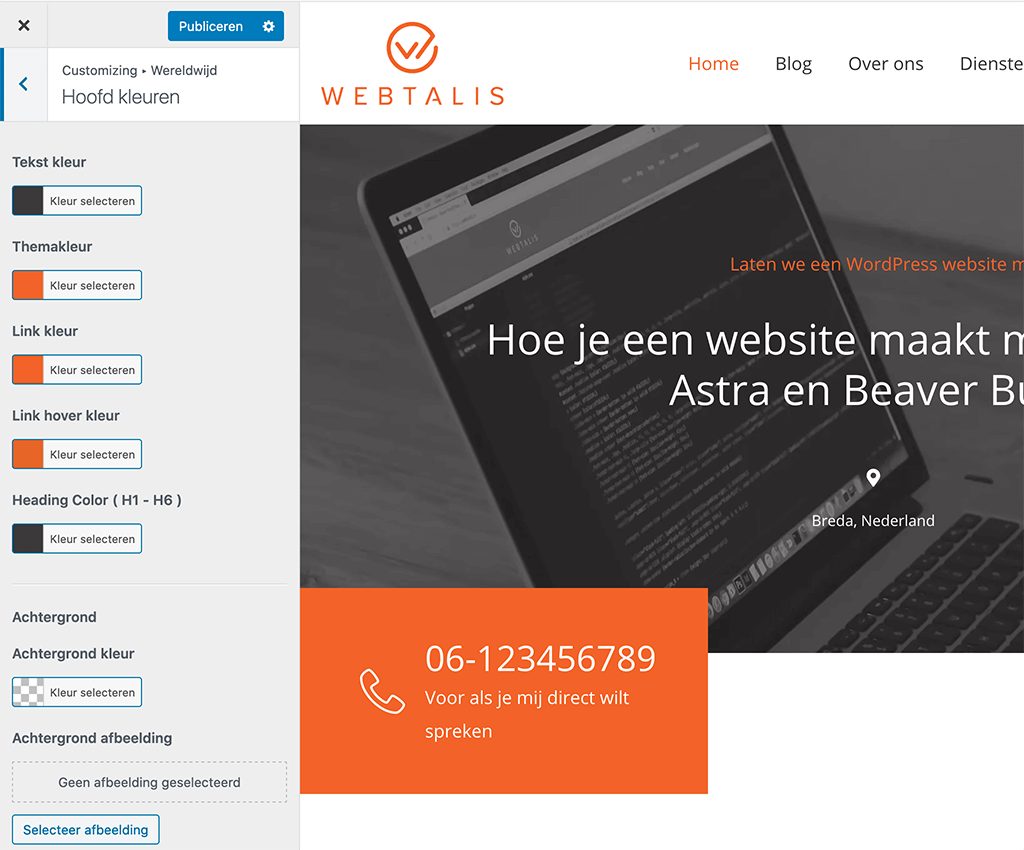
I probably don’t need to give you much explanation of what the colors are for since it’s just there in English. You can change the colors here for the text, theme, link, link hover, heading, and background.
The theme, hover, and header color may need some extra explanation. The theme color is used for global things in the theme that have a color to stand out. So this should be your absolute main color.
The link hover color is used when you hover over a link.
The Heading Color is not translated but is simply the color for the titles/headings on the pages of your website.
To customize color, you can click on “Select Color,” and then you can enter a color code or pick a color.
When you modify a color, you can view it directly on the right side via the live preview. Don’t forget to click “Publish” to make your changes.
Set up logo on your WordPress website
Of course, you want to set a logo on your website. This is the main recognition point of your website. You can set a logo by going to “Header -> Site Identity.”
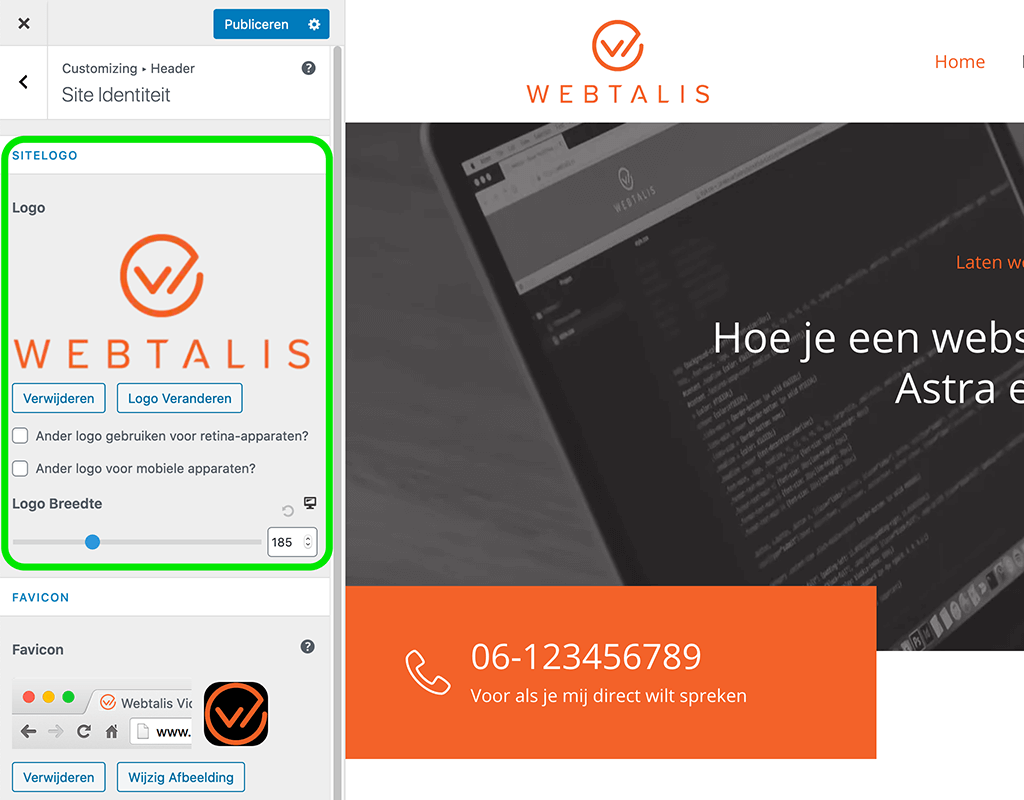
You will now see a number of options. You can click Change logo to add your own logo to your website.
If you want to use a different logo for retina devices, you can check this box and select a different logo. The same goes for mobile devices. Check “Other logo for mobile devices” to select a different logo for mobile.
You can further customize the Logo Width. You can simply drag the bar to the desired width. You can immediately see the width of your logo change on the right side.
Now that you are on this settings page, you can immediately set a favicon for your website.
Viewing your website on different devices
In the customizer, you can easily see how your website looks on different devices. You have the following three buttons at the bottom of the customizer.
By clicking the left button, you can see what your website looks like on a desktop. The middle button is for tablets, and the right button lets you see what your website looks like on a smartphone.
You can view all of this just from your own browser. For example, when you look at how your website looks on a smartphone, it looks like this:
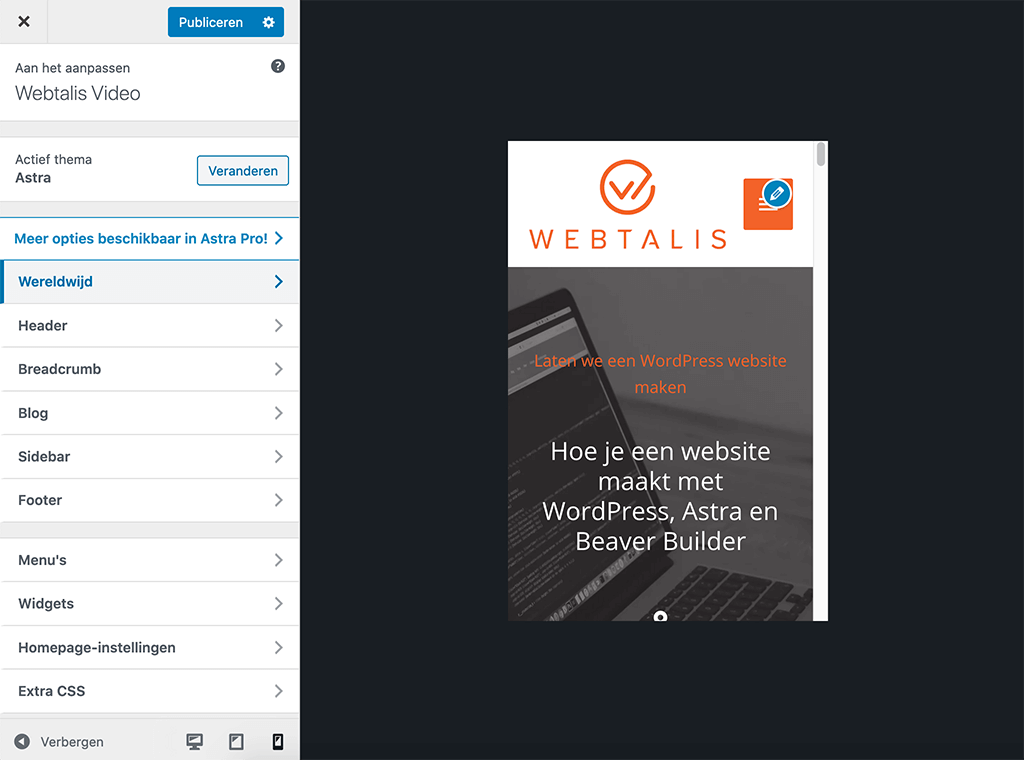
As you can see, you can now fully use the website as you would on a smartphone. You see a menu that you would also see on a smartphone, and you can scroll throughout the page.
In my opinion, this is a great method to see how your website looks on different devices. This way, you don’t have to have all devices at hand.
Customizing pages with Beaver Builder
All the pages you created during the creation of your WordPress website using the Astra theme were created with Beaver Builder.
Let’s grab a page and see how we can modify it. In this case, it might be more convenient to also grab the video so you can get a better idea of exactly how Beaver Builder works.
To get started customizing pages with Beaver Builder, you can go to the page of your website that you want to edit. At the top, you will see Beaver Builder in the menu. Click on it to be able to edit the page.
The green dot next to “Beaver Builder” indicates that the page you are viewing was created using Beaver Builder.
Once the button is pressed, you can edit the page. The first time you want to edit a page in Beaver Builder, you will be asked if you want to start a tour.
There is no harm in starting this tour. You’ll immediately get a good idea of what Beaver Builder can do for you.
Modifying elements (modules) in Beaver Builder
We have installed templates so that we have everything conveniently in the right place. So at first, you will mainly want to change texts, backgrounds, and colors.
To modify elements, which in Beaver Builder is called modules, you just have to click on them. Then you can change text and also change colors and other things. Check out an example below where I easily change the text of a heading module.
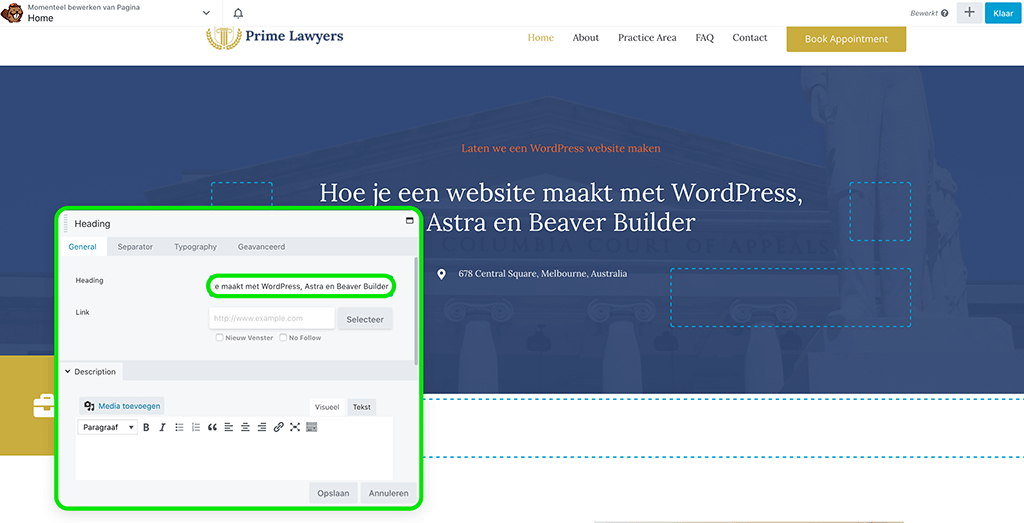
So all I do is simply click on the text. Then a screen comes up where you can make adjustments. For example, in the image above, I changed the large white text.
In addition to being able to customize the text, you’ll also see more options in terms of settings. At Separator, you can add a separator line if necessary. At Typography, you can change the font, font size, and color. In Advanced, you can also influence the margin (space) above, below, and beside the text. Enough possibilities.
I can only recommend that you browse through everything and get a good idea of what Beaver Builder can do. Each module may have slightly more or fewer settings.
Customize row settings in Beaver Builder
Now you see an image in the background of the text that is displayed across the width. You cannot simply click on this to change it. This is a row setting. You get to the row settings by hovering your mouse over a row and clicking on the tool icon (wrench) in the top left corner.
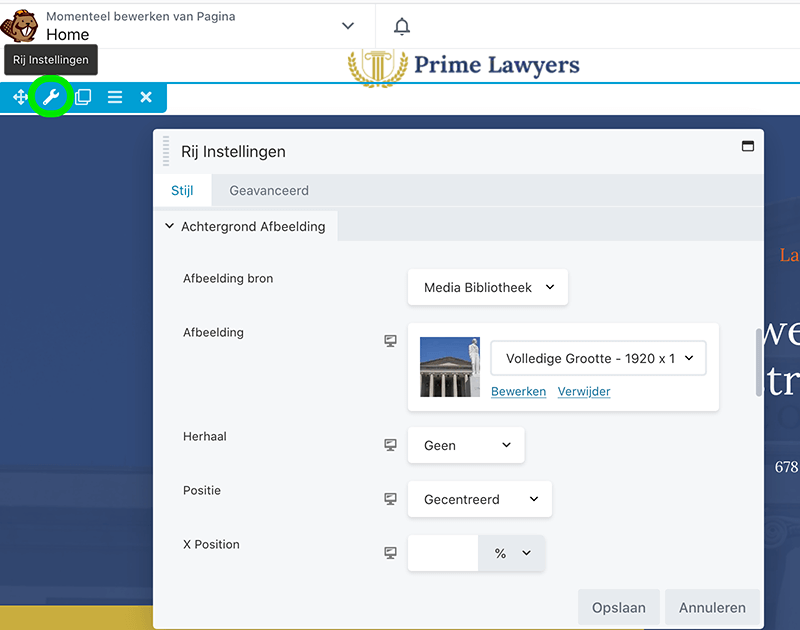
Then it’s scroll down until you see the image. You can change the background image by clicking edit and selecting a different image. In this case, you will also see a blue glow on the image, while it is not present on the original image. This is an Overlay that is being used.
You can adjust the overlay by going a little further down in the settings. You will then come across Background Overlay.
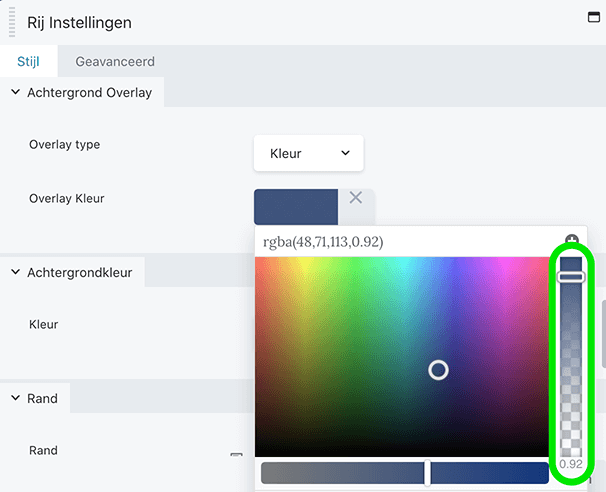
When you click on Overlay Color, you can choose a different color or enter the color code. Then you can indicate on the right-hand side how much the color should shine through so that you can also see the background image clearly.
In addition to the above settings, in the row settings, you can also adjust things like the width, height, text colors, and things like that. So be sure to look at everything carefully.
Stored colors in Beaver Builder
With a website, you use a select number of colors. Remembering the color codes of your colors is no fun. Personally, I keep forgetting, and it takes a little time to look it up every time.
Beaver Builder has, fortunately, come up with something for this. You can save colors, allowing you to find and use the colors immediately next time. I’ll tell you how to do this.
Customize the color of an item on your website. It doesn’t matter which component.
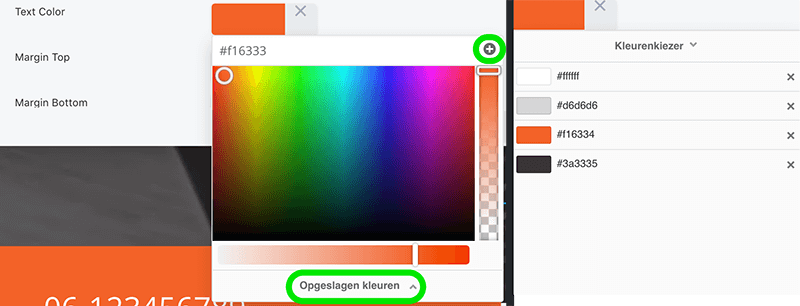
You will now see a plus (+) sign next to the color code. Click on it once you have entered your desired color. You will then receive a message that your color code has been added to the saved colors. When you click on Saved Colors, you can now easily select your chosen color. You don’t have to look up the color code every time anymore. Super convenient.
Add your own rows, columns, and modules.
I hope you’ve got the basics of Beaver Builder down a bit and can get started customizing all the elements on your website.
However, you may also like to add things to a page. I’ll explain how to add additional rows, columns and modules.
To add additional modules (elements) to a page, you can click the plus (+) icon in the top right corner next to the blue “Done” button.
You can choose here whether to add a module or an additional row. A row can contain more than one column. Each column can have its own modules such as a photo, text, video, and much more.
Let’s say I want to add a two-column row to a page. I drag a row to where I want it to be on the page. Then I drag the modules into the columns where I want them to be. See how it works here:
Pretty simple right? As soon as you drag a module into a column, you can make changes immediately.
Where are the Ultimate Addons modules?
Of course, we also installed the Ultimate Addons for Beaver Builder plugin. You get extra modules to use, thanks to this plugin.
When you try to find the modules yourself, this might be a difficult task. Therefore, I will tell you where these modules are so that you can also add the Ultimate Addons elements to your pages yourself.
Click on the plus (+) icon at the top right of the page. Next, click on Modules and then Standard Modules. You will now see the options you see in the images on the left.
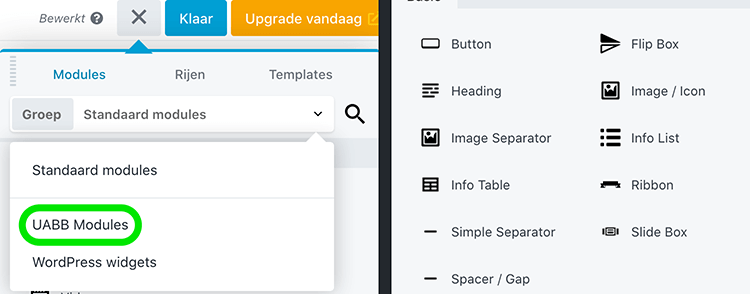
Now click on UABB Modules to get to the appropriate modules. You will now see all the modules pop up that you see on the right side of the image.
I hope the basics of Beaver Builder are clear to you. It’s a bit hard to explain with just text and images, so I urged you to watch the video that accompanies this page. It will give you an even better understanding of how Beaver Builder works.
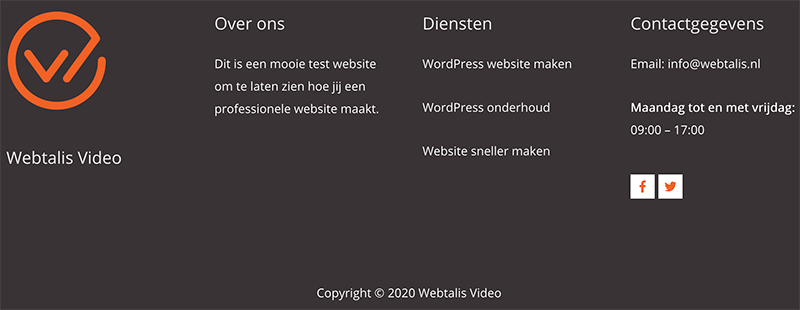
At the very bottom of a page of a website is always the footer of a website. This often contains some useful links and, for example, the address and contact details of a company.
You can usually fill the footer with widgets. With the Astra theme, this is also the case. You can get to a page with Widgets by going to “View -> Widgets” or to “Customizer -> Widgets.” Since the customizer shows the changes live, I always choose to modify it through the customizer.
We have four rows in the footer in this theme. These are four different widget areas like you see in the Widgets.

It goes in order from left to right. Footer widget block 1 is the leftmost row, and block 4 is the rightmost row.
To add or modify a widget, you can click on one of the blocks. To edit a widget, you can click on the corresponding widget.

If you want to add an additional widget, click on Add Widget. You will then be given the option on the right-hand side to choose from all widgets. When you click on a widget, it will be added. In this way, you can easily create additional widgets.
Want to remove a widget? Click on the corresponding widget to open and edit the widget.
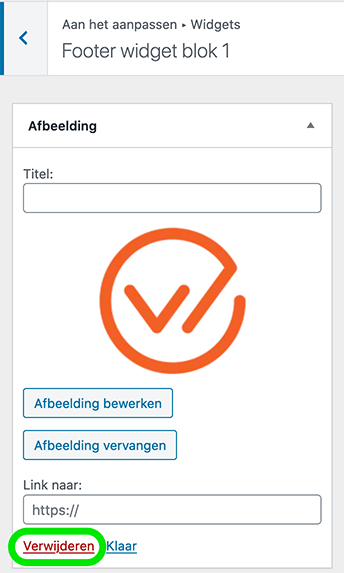
Then all you have to do is click the Delete button to get rid of the widget.
Add a contact form to your website.
Every website has a contact page with a contact form. This is the easiest method for visitors to get in touch with you.
If you have a template of the Astra theme installed, the plugin WPForms will also be installed. This is the plugin that we will then also use to place the contact form.
It may very well be that your contact form is already placed correctly while importing the templates into your website. Making a WordPress website difficult? No, it can be made that easy when creating a website in WordPress.
Anyway, you will always have to modify the form further. For this, we go to the admin area of WordPress and then to the menu item WPForms.
You will now arrive at a page where you will see all the contact forms that your website has.
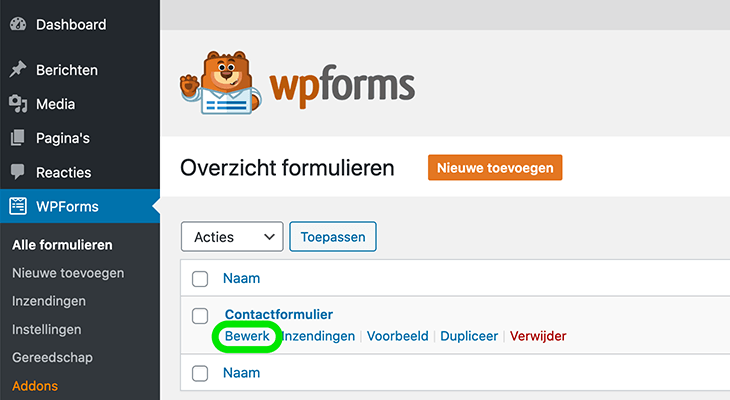
There will already be a default form created that we can use. Move your mouse over the form and click Edit. You will now get to the fields of the form.
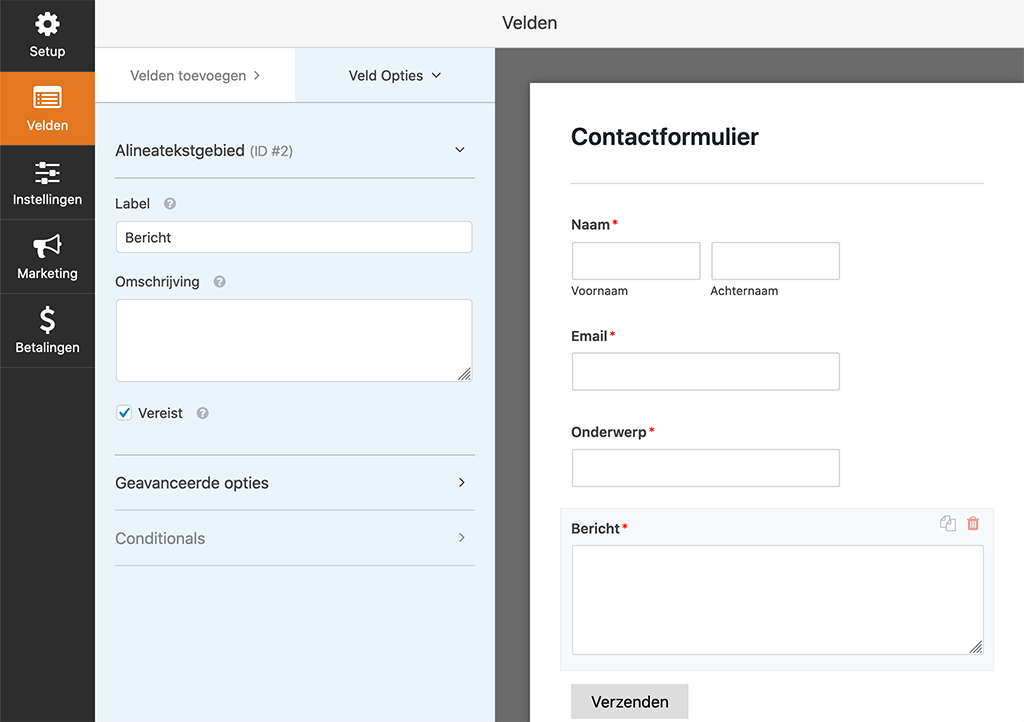
Click on the created fields to translate the names into Dutch at Label. Here you also have the option to indicate whether each field is a required field that must always be filled in by the visitor. You can check the Required box to make it so.
Should you wish to add additional fields, this is no problem at all. Go to “Fields -> Add fields.”
You will now see all the standard fields that you can use. There is even a reCAPTCHA field if you want to protect yourself from spam coming in through this form.
When you see a field that you want to use in the form, you can drag the field with your mouse to the position in the form where you want it. Then you can set the field to your liking.
It is also important that you receive the form at an e-mail address of your choice. You can set your e-mail address by going to “Settings -> Notifications.”
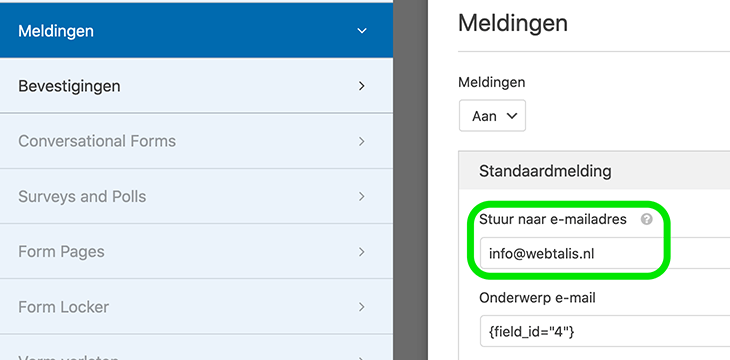
You can change the Send to email address to the email address you would like to receive all submissions to here at “Default Notification.”
By default, there is some sort of code here indicating that it will be sent to the website administrator’s email address. This is the email address you entered when installing WordPress. Check if this is the email address you want to use. Is this not the case? Then enter the email address you do want to use and click on Save in the upper right.
Once someone has completed and submitted the contact form on your website, you obviously want to make it known that this was successful. You can therefore display a notification that the message has been sent successfully. You can set this up by going to “Settings -> Confirmations.”
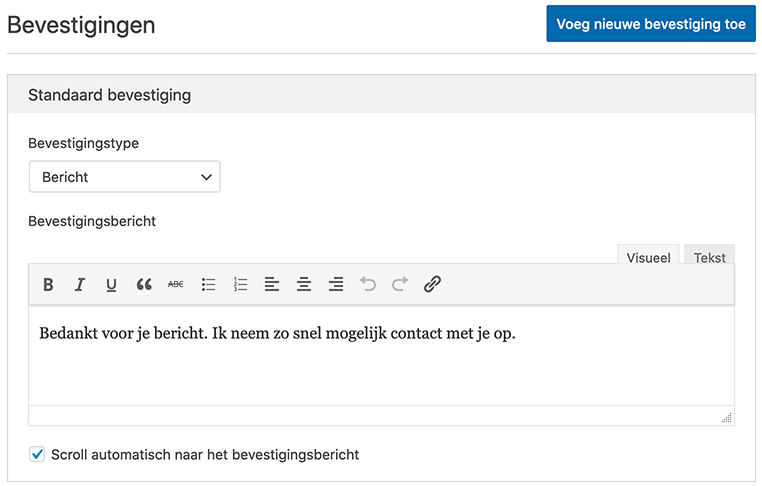
Under Attachment Type, you have three options. You can show a message; this is what I always do. However, you can also redirect people to another page with the Show page option, or you can redirect people to a specific URL.
Under Confirmation Message, you can add text that people will see once the form is filled out. I would leave the option “Automatically scroll to the confirmation message” checked. This ensures that the message is always immediately visible. Finally, click Save at the top right to make your changes.
Once you have set up and saved the contact form, you can click on Embed in the top right corner. You will then see something like the image below.
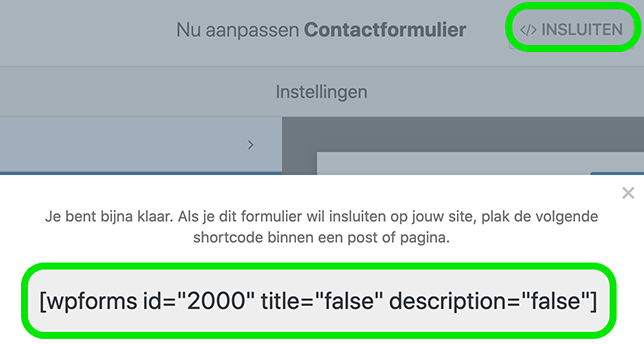
Copy the shortcode you get from WPForms. You can paste it in the location where you want to display the contact form. You don’t need to add a special module for this. You can use this shortcode in a normal text module. The only thing you have to pay attention to is that it is on its own line, and then it will already work.
The end result may look something like the one below:
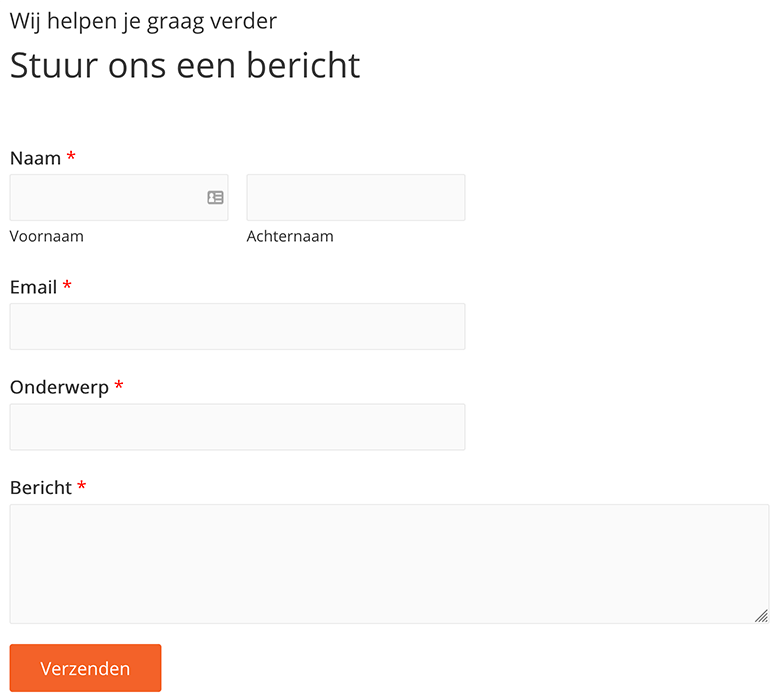
An excellent result, of course. Keep the submissions coming via the contact form.
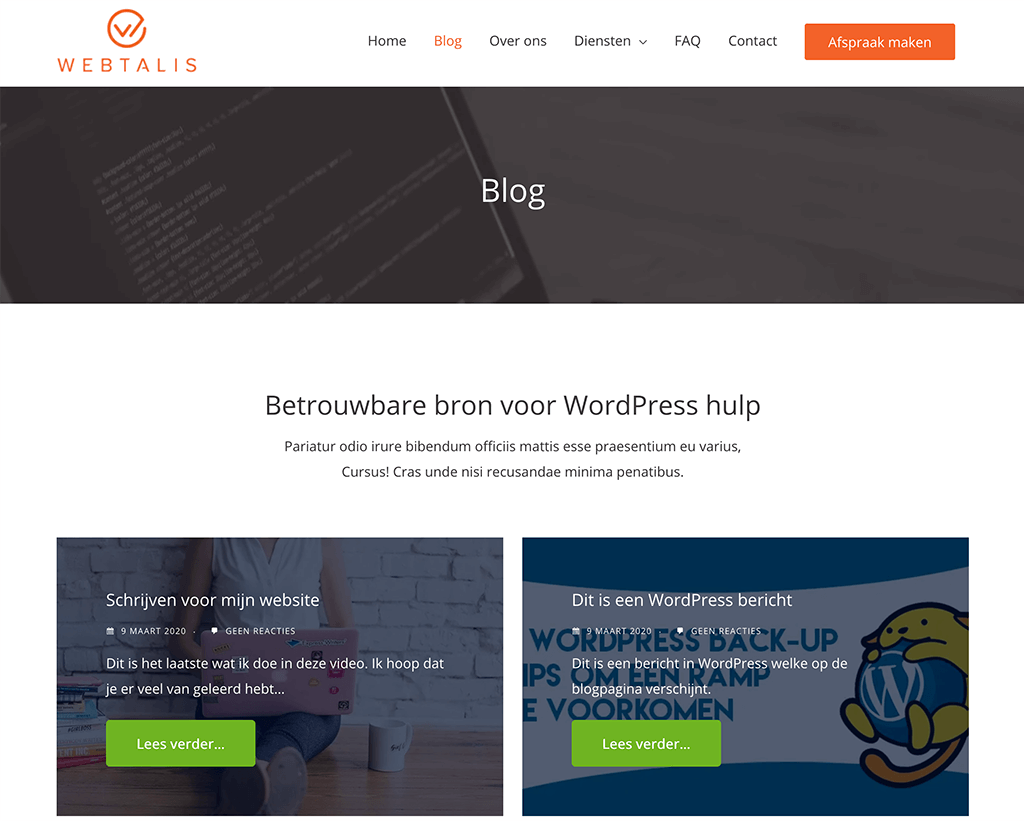
Step 7: Create a blog page on your WordPress website
Do you also want to start blogging on your website? Then did you already know that you have to write blogs through Posts? Pages are only for the global pages of your website and Posts for your blog articles.
You can then display your written blogs on a blog page. At the moment, we do not have a blog page, but this page can, of course, be created.
The best thing is to once again use a template. It doesn’t have to be the current template you chose, as it may not include a blog page.
Therefore, we can go back to “View -> Starter Template” to pick a blog template as well. You can enter “Blog” in the search field to see all blog templates. At “All,” you can indicate that you only want to see the free templates.
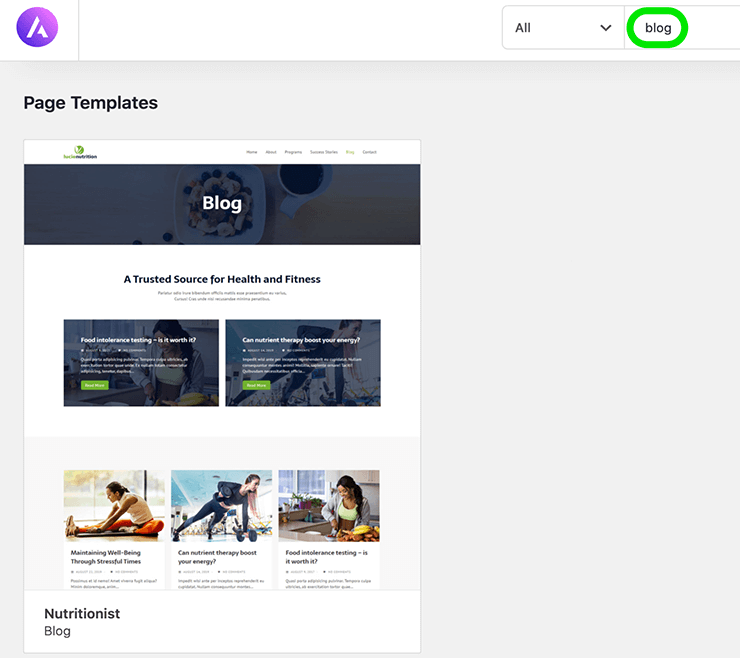
At the time of writing, there is currently only one free blog template available. Click on the template. You can now select the blog page to view a good example of this.
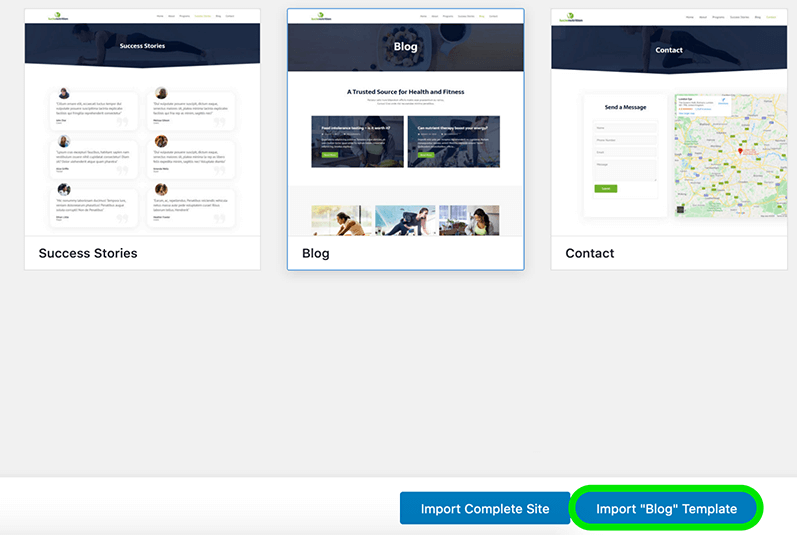
If you want to import the blog template, you can click Import “Blog” Template. You will then import only this page and not the other pages, because after all we don’t need those either.
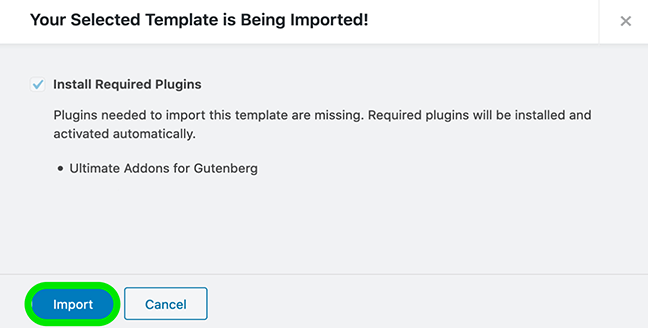
As you can see, in this case, we need an additional plugin to make the blog page work properly. This is the free plugin Ultimate Addons for Gutenberg. There is no problem with this plugin being installed on the website. So you can just click Import to import the blog template.
Once everything is imported, you can view the template live on your website. Depending on the number of posts on your website, you can already see some things.
The design of the blog page I have chosen here cannot be customized with Beaver Builder. It can be customized with WordPress’ default editor. Go to your blog page and click on Edit Page at the top. You can also get there by going to Pages -> All Pages.
You will now land on the normal editor of WordPress. It actually works pretty much the same as Beaver Builder. You can click on the different parts to adjust the texts and various settings.
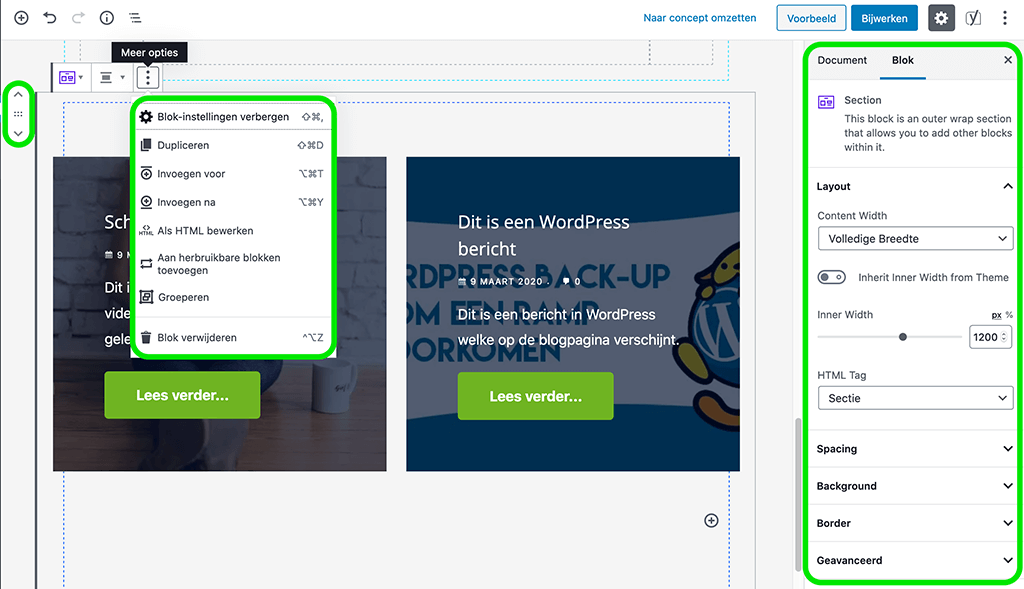
On the left side, you can determine the position on the page of all the rows. Do you want a certain item to be at the top of the page? Then it’s just a matter of clicking on the up arrow or the 6 dots to drag it to the right location.
With this template, you have 2 options for how to display the blog posts on your website. Choose the option that suits your website best. The other Block can be removed by clicking on More Options and then Delete Block.
Want to change something about a particular section? Click on the component. On the right side, you will then see several options related to the Block you selected.
The default editor of WordPress is very comprehensive. If you want to learn more about it, I recommend you to check out the article WordPress Gutenberg editor explained. You will then really learn everything about this editor.
By the way, don’t forget to add your blog page to your website’s menu as well.
Website creation – Additional tips that are helpful to know
Are you done creating your own WordPress website? Probably not, because a website is never finished. I have therefore listed several tips for you that may be of use to you for your website.
These include how to add and customize titles and descriptions for use in search results, how to integrate Google maps, add additional users, change your screen name, and where to get free images that you may place on your website.
Are you ready to learn even more? Here we go.
Adding titles and descriptions to your articles for use in search results
Earlier in this article, when we were just starting to create a WordPress website, we also installed the plugin Yoast SEO. This plugin is an excellent choice if you want to improve the search engine optimization of your website.
You can choose the title and description on each page. This is definitely important to look at since we installed an English template in the beginning, and these details are probably still filled in.
To add the titles and descriptions to a page on your website, we can go to “Pages -> All Pages.” Then edit a page you want to add a title and description to and scroll to the Yoast SEO box.
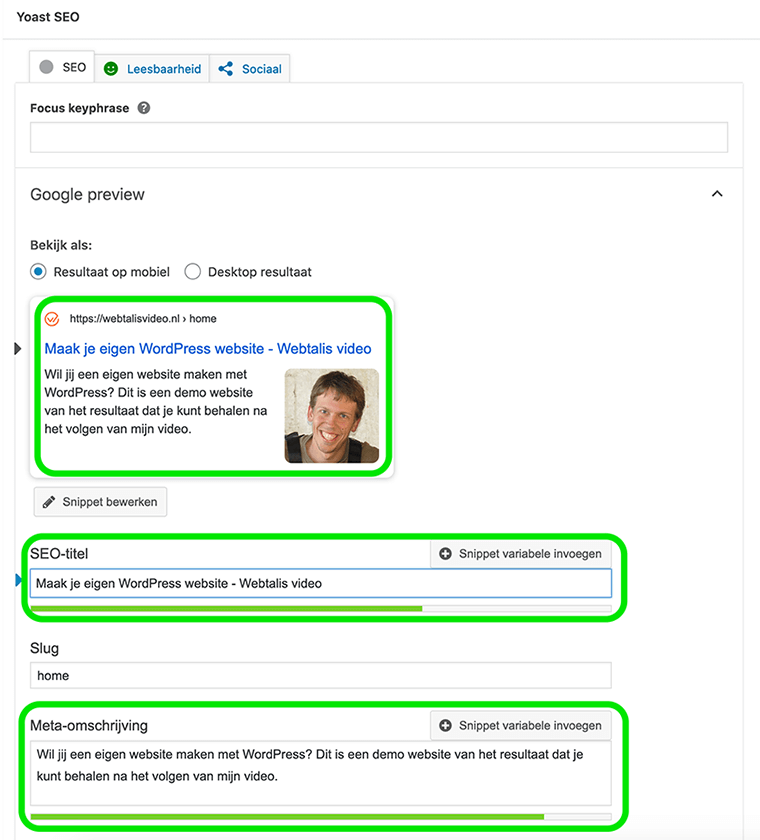
Once you arrive at Yoast SEO, you will initially see only the preview. Here, click on the title or description to bring up the SEO title and Meta descriptions fields.
You can now add a title and description and immediately see how it will look in Google. The green bar below the fields indicates whether the title and description are a good length for Google.
If you want to check whether your article is properly optimized, you can enter the keywords for which you have optimized the page at Focus Keyphrase. Yoast SEO will then perform a check and indicate whether there are any improvements.
Adding Google maps to your WordPress website
I have already written an article on how to add Google maps to your website. I just want to provide you with all the tips directly on this page, so I will cover them here as well.
To add a map, you can go to the Google Maps website and enter the location you want to show on your website. In this case, I choose the city “Breda.” You will then see the following on the left side of the page:
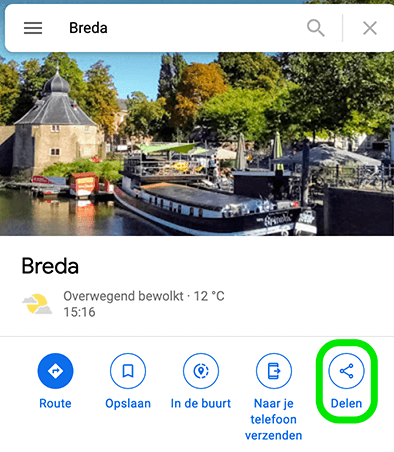
When you click on Share here, you will be given the option to embed the card on the website.
Click on Embed a card. You will now see an embed code. Click Copy HTML to copy the embed code.
You can now paste it to the location on your website where you want to display it. I’ll show you. In my example website, the contact page has a Google map. Let’s update this map with this code.
All you have to do to do this is start Beaver Builder and click on the Google Maps map.
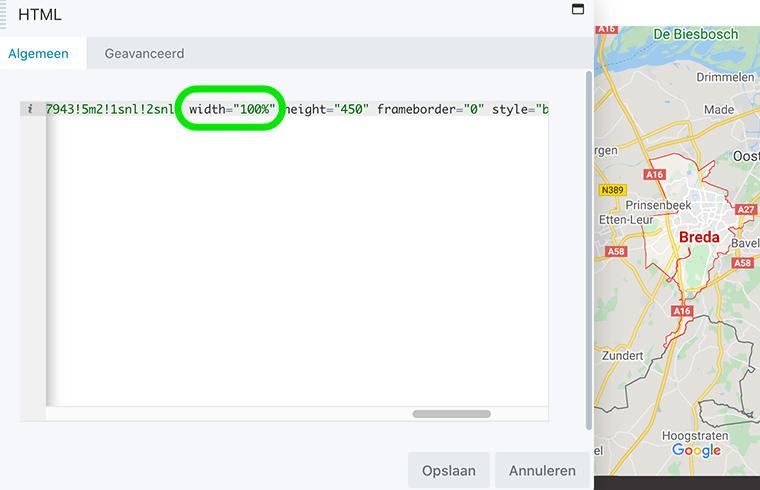
You will now see the HTML module pop up. Replace the existing embed code with the embed code you got from Google.
On the contact page, the card is displayed full width. It is, therefore, necessary to make another small adjustment in the embed code. Look for the word “Width.” Change the number of pixels to 100% so that the card takes up the full width. Finally, click Save to make your changes.
Do you want to display Google maps somewhere else on your website? With Beaver Builder’s HTML module, this is never a problem, and you can decide where Google maps are displayed.
Adding additional users to your website
Creating a WordPress website is something you can do all by yourself. Writing articles and managing your website, you may not want to do it alone. Therefore, it can be useful to add additional users to your website. This way, each writer has his or her own account, and you can display the correct names of writers with the articles without any problems.
To add an additional user to a WordPress website, you can go to “Users -> Add New.” You will now land on the page below.
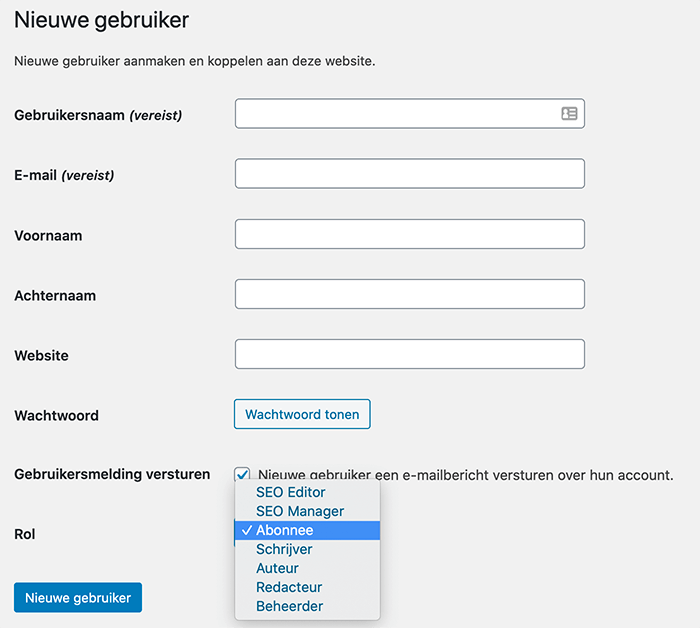
I won’t have to explain much here since almost everything speaks for itself. The only thing that does matter is how the user roles of WordPress are structured.
You are an administrator yourself. This allows you to really edit everything on your website. Someone who writes for your website does not need these rights. He or she would be much better off being an Author. With this user role, the person writing for you can create, edit and publish posts themselves. If you want a writer to be able to manage other people’s posts as well, then Editor is the best choice.
The change screen name of a user
When you publish blog posts on your website, in many cases, you will also see the name of the author who wrote the post. Initially, this is often the username of an account. When the username is, for example, your email address, then, of course, this does not look very nice.
Above, you can see that the screen name of my demo website is initially my email address. To change the screen name, you can go to “Users -> Your Profile.”
When you scroll down on your profile page, at some point, you will come across the heading “Name.” In this section, you will also see Screen Name (required). Fill in the author name you want to display on the website here.
Next, at Screen Name (as shown on the site), you can choose which name you want to be displayed on the website. Here you can choose from your username, first name and last name, screen name, among others.
Finally, at the very bottom of the page, click Update Profile. From now on, your author name on the website will be the name you chose.
Where to get free photos to use on your website
Everyone uses photos on their website. While creating your WordPress website, we imported templates that immediately brought some photos with them. Images are important.
Finding photos is not difficult, but did you know that you can’t just pull images from Google to put on your website? There are copyrights on photos.
Fortunately, you can find websites where there are photos available that you can always use. Sometimes with acknowledgment of the source and sometimes even without any acknowledgment at all.
If I had to recommend a website where it is best to get photos from, I could recommend the website Pixabay.com.
Once you have found an image on this website that you would like to use, you can check out the license on the right side and what you need to do to be allowed to use the image. See the example below:
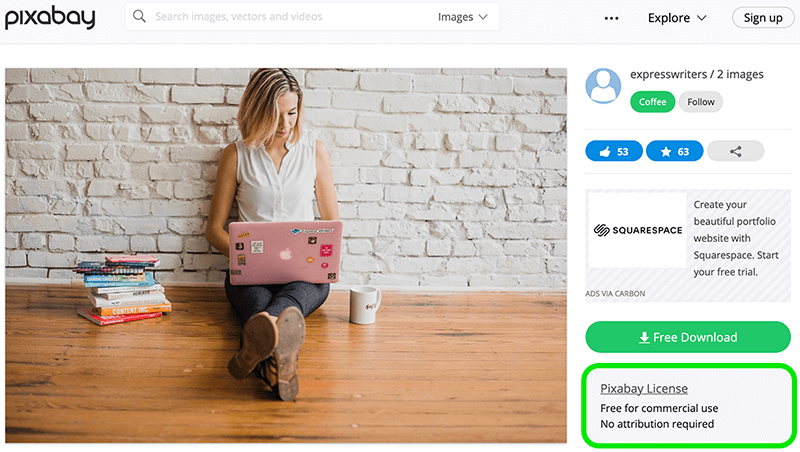
On the left, you can see the photo I want to use. On the right, you see the Pixabay license. This says that you can use this photo for free, even for commercial purposes. No mention of the creator is required either.
So you can download this photo and use it on your website without any worries. On Pixabay, many photos have this license, but it is always wise to check before you download an image and use it on your website.
Track statistics of your website
When your website is created and online, of course, you want to know how many visitors you are receiving on your website. I always use Google Analytics to keep track of the statistics.
Go to the Google Analytics website to create an account for your WordPress website. Once you have done this, we can link this account.
We already installed the Google Analytics by MonsterInsights plugin at the beginning of this article with the SiteGround WordPress Starter.
Now when you have created an Analytics account, you can go to “Insights -> Settings” in the admin area of WordPress.
You will now arrive at the page below where you can connect to Analytics or enter a UA code.
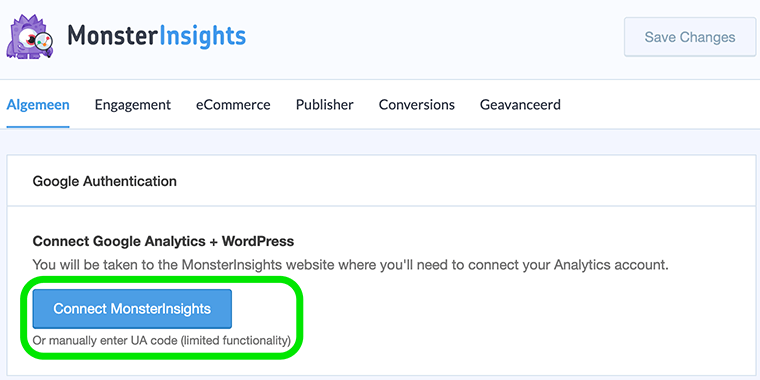
To connect to your Google Analytics account and at the same time ensure that you can view the statistics on your WordPress website, you can click on Connect MonsterInsights and follow the steps.
Do you want to view the statistics via Google Analytics? Then you can choose to add only the UA code of your website. You can find the UA code by going to “Administrator -> Property Settings” in Google Analytics. It will then be listed directly at the top as a Tracking ID. Using this UA Code, statistics can be tracked.
Once you have Google Analytics set up, you should see results within a few hours. It’s best to just check the next day to see if there are any statistics to look at yet.
Create an email address with your own domain name
When you have your own domain name, you obviously want to be able to send emails using an email address that contains your own domain name. If you have taken hosting through SiteGround, you can log in to your SiteGround account, go to Site Tools, and then to Email -> Accounts.
You will now arrive at a page where you can create new email addresses.
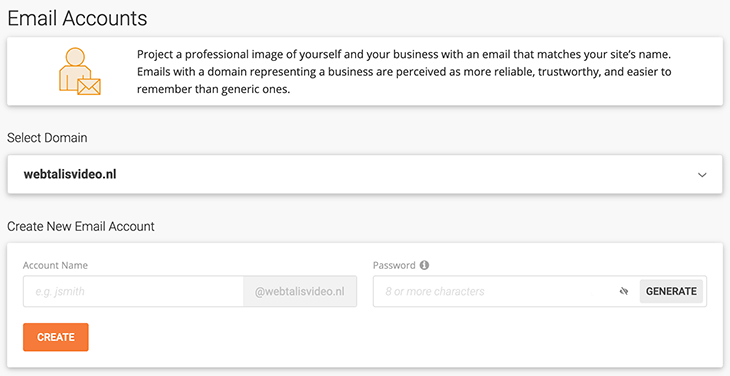
Here it is a matter of indicating which email address you want and you can generate a password for your new email address. Then click Create to actually create the email address.
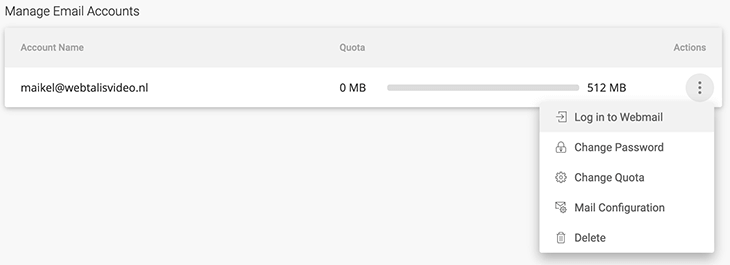
Once you have created your email address, you will, of course, want to know how to view your mail through this email address. You have now been given an option “Manage Email Accounts” with the heading “Actions” on the right.
When you click on the actions, you will see that you can log in directly to the webmail. From here, you can always check your emails. Of course, I understand that this is a long way to view your emails. Fortunately, you’ll also see a menu item called Mail Configuration. Here you get information on how to retrieve the emails that arrive at this email address from another mail program. For example, you can also retrieve all emails through Gmail.
In helping hundreds of people create a WordPress website, I naturally come across the same questions with some regularity.
Here are some answers to frequently asked questions about starting and creating a website.
FAQs
Can I create a website only with WordPress?
No, there are plenty of other website builders you can use. However, I believe that WordPress is the best and easiest software to create a website with. Also, you really have everything in your own hands because you have your website in your own hosting environment.
How do I start a website where I can sell products?
It is quite easy to turn your WordPress website into a webshop. The plugin WooCommerce is the most popular plugin when it comes to creating a webshop.
Is knowledge of HTML or CSS necessary to customize my website?
No, you don't need any programming knowledge to create a website with WordPress. There are several page builders that make creating beautiful pages super easy.
In this article, we will therefore make use of Beaver Builder. The need to know HTML and CSS in order to modify things is long gone.
How can I create a free website?
You can find a number of website builders online with free options, but I can only advise against using them. Often you don't get your own domain name, the logo of the company in question can be seen on your website, or advertising is placed there. This, of course, does not look professional.
It is much better to purchase a domain name and hosting so that you have full control over your own website. You can be ready for as little as €60 per year.
How can I make money with my website?
After helping people create a WordPress website, the question "How can I make money with my website?" comes up quite often. I can tell you that there are an awful lot of ways to make money with your website.
You can make money by:
- Selling your services;
- Showing Google ads on your website;
- Getting started with affiliate marketing;
- Turn your website into an online learning environment;
- E-books to write and sell;
- Donations to be received;
- Sell products through a webshop plugin.
These were just a few ways; there are many more. However, it is important to remember that you can't just get rich quickly with a website. There is always a lot of time and energy involved.
How do I get to the top of Google?
Everyone wants to be at the top of Google's search results. This is not at all easy and certainly not a push-button job.
You will need to make sure that your website is the very best for what you want to rank for.
For example, I want this article to rank for all kinds of keywords related to making a WordPress website. I have tried to write the very best article ever for this so that Google cannot ignore me. Even now, however, it is not a guarantee that I will then actually come out on top.
You need to start doing this with your website as well. Make sure you are the best and that Google can't do anything but put your website high in the search results.
Also, give your website enough time. New websites don't have a reputation in Google yet, so you really won't get to number 1 overnight. You will slowly grow and expand, and eventually, you will see that you can rank high in Google.
Can I get a domain name or hosting for free?
Yes, with some hosting companies, you get a domain name for free (sometimes only the 1st year) with your hosting package.
You hardly ever see a domain name and hosting both for free. When you do see one, it almost always has unpleasant snags. So don't start.
SiteGround is a WordPress hosting provider officially recommended by WordPress. You don't get a domain name or hosting for free here, but you do get a 60% discount on the 1st contract period.
Can I password protect my WordPress website?
When you are creating a website with WordPress, you might not want to have any visitors right away. After all, your website is not ready yet, so it is not always convenient to receive visitors already. You can therefore choose to protect your website with a password.
In WordPress, this is quite easy to do, but it is not standard functionality. In the article Making WordPress Website Private, I show you step by step how to protect your website behind a login.
How can I back up my website?
Very good that you are working on wanting to make a backup. Many hosting providers automatically make a daily backup for you. Of course, you need to check if this is the case with your hosting provider.
Furthermore, you can always go a step further, something I definitely recommend, and make backups of your WordPress website yourself.
3 WordPress plugins
A WordPress website has two plugins by default, which are Akismet (against comment spam) and Hello Dolly (the first official WordPress plugin that symbolizes hope through song lyrics.
You’ll want to install a few more plugins soon, however; we recommend adding these three plugins right away:
- Plugin 1: Yoast
- Yoast plugin is an SEO plugin that helps you make your website search engine friendly. This applies to URLs, page titles and descriptions, and even the content of the texts on the website. This is the most used SEO plugin worldwide, created by Joost de Valk.
- Download from yoast.com (Free & Premium €79 per site)
- Plugin 2: WP RocketWP
- Rocket is a Cache plugin. With this plugin, you can instantly provide your website with page caching, browser caching, GZIP compression, and more. It is one of the best plugins out there; unfortunately, it is not a free plugin; you pay a one-time fee of $49.
- Website by WP-rocket. me (From $49 per site)
- Plugin 3: Contact Form 7Almost
- every website needs a contact form. With Contact Form, you can easily create professional forms. There are now 5 million websites using this plugin.
- Download from WordPress (Free)
Your website has been created! How to proceed?
Super good that you got this far in this article! Many people will have already dropped out, but you are a real go-getter. Exactly what you need to make your website successful.
Now that you have created a website, you are far from finished. You will need to create a plan of action with what you want to achieve with your website and how best to go about it.
Making your website a success is a long process, but you are already off to a good start. You will now be able to continue writing articles, delve further into WordPress, email marketing, search engine optimization, and things like that.
Don’t expect the results you envision within weeks. This often takes months or even longer time.
I hope this comprehensive guide on how to create a website without hiring a developer or spending thousands of dollars has helped you.
If this article helped you create a website with WordPress, I would greatly appreciate it if you would like to post a comment or share this article on social media.
 (Пока оценок нет)